The JoyR1der user guide
Start with What is JoyR1der? and Clicks and Bonus Clicks. Then jump to what you want to do. You can open this guide any time in the app from You › Settings › JoyR1der User Guide, or ask @howto.
What is JoyR1der?Live events and rides with real hosts, paid for in Clicks.
JoyR1der is an app for live experiences. A host goes live with a workout, a music set, a cook-along, a language lesson or a city walk. You join, watch and take part in real time. We call joining a host a ride.
- Browse for free. Look through what's on, and take a free 2-minute peek at a live event before you pay.
- Join and pay as you go. Most live events cost Clicks per minute. Some charge one ticket price. There are no free events.
- Take part. Chat in the event, tip the host, and come on camera or mic when the host lets you.
- Book a host. Ride with a host who is free right now, ask for a custom ride, or book one of their services for later.
- Post and connect. Write posts, comment, follow people and send messages.
Every account is for adults (18 and over). Every account can ride and every account can host, so there is nothing to switch on. Hosting is covered in Hosting — getting set up.
Getting startedCreate your account, confirm your email, and do the free selfie check when you need it.
You need to be 18 or over to have an account. You can sign up with your email address, with Google, or with Apple.
Sign up with your email
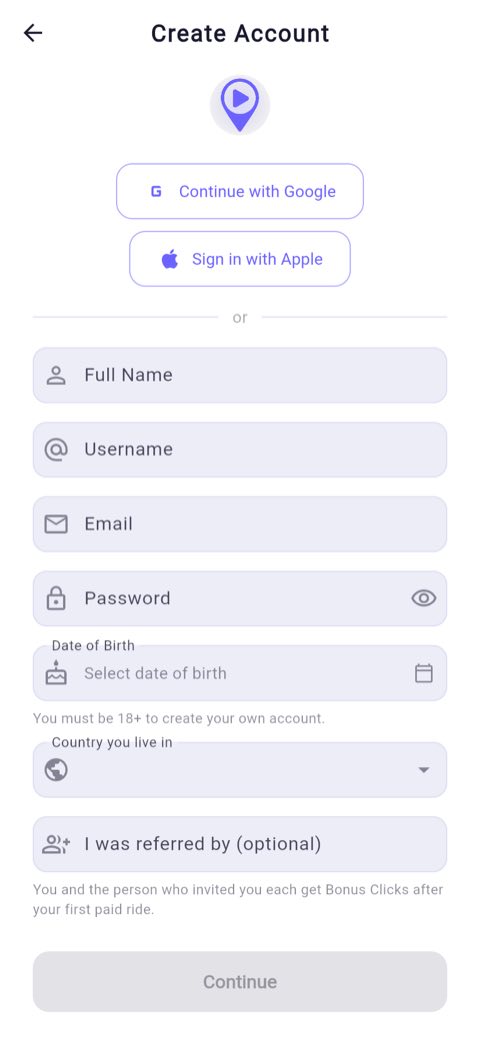
- On the sign-in screen, tap Create an account.
- Fill in Full Name, Username, Email and Password. Your password needs at least 8 characters. The app checks your username is free as you type.
- Pick your Date of Birth. You must be 18 or over.
- Pick your Country you live in.
- Tick I verify that I am 18 years of age or older.
- If a friend invited you, type their @username or email in I was referred by (optional).
- Tap Continue.
- On Review and agree, read the Ride, Host and Promote cards. Tick I agree to the JoyR1der Terms & Conditions, Privacy Policy, Community Guidelines, and Code of Conduct.
- Read the age-check consent below it. Tap Agree & Create Account. If you would rather prove your age with a government ID than with a selfie, tap Prefer to verify with ID instead? first. The button then reads Agree & verify with ID.
Your account is created. A welcome screen opens, and then the app asks you to confirm your email (see below). New accounts get a one-time welcome of Bonus Clicks (currently 250). Like all Bonus Clicks, they expire after 30 days.
- If you are under 18 you see "You must be at least 18 years old to join JoyR1der".
- JoyR1der isn't offered in a few countries. There you see "JoyR1der isn't offered in your country or region."
- Continue stays blocked until your username is free ("Choose an available username to continue.") and the age box is ticked ("Tick the age confirmation above to continue.").
- The welcome amount is set by JoyR1der and can change.
Priya fills in her name, picks the username priyaruns, sets her date of birth and country, and ticks the 18+ box. Her friend Sam invited her, so she types @sam in I was referred by (optional). She taps Continue, ticks the agreement and taps Agree & Create Account. Her account opens with her welcome Bonus Clicks, and the app asks her to confirm her email.
Sign up with Google or Apple
- On the sign-in or Create Account screen, tap Continue with Google or Sign in with Apple.
- Finish signing in with Google or Apple.
- On Almost there ("We just need a few details before you ride."), fill in what's missing, such as your date of birth and country.
- Tap Get Started. If you don't have a username yet, the app asks you to choose one next.
You get the same welcome screen and welcome Bonus Clicks as an email sign-up. A Google or Apple account has no JoyR1der password. You can add one later with Set a password on the You page.
Leo taps Continue with Google and picks his Google account. On Almost there he adds his date of birth and country, taps Get Started, and chooses the username leo.k.
Confirm your email
If you signed up with an email address, the app shows Verify your email until you confirm it. Most of the app stays locked until then.
- Open the email from JoyR1der. The screen shows the address it went to ("We sent a verification link to:").
- Tap the link in the email.
- Go back to JoyR1der. The app checks every few seconds and lets you in by itself. You can also tap I've verified my email.
- Tap Resend verification email. You can resend once every 60 seconds. If you ask too often you see "Too many requests — please wait a few minutes before asking for another email."
- Typed the wrong address? Tap Wrong email address? Change it.
- Signed in to the wrong account? Tap Use a different account.
Priya opens her inbox on her phone and taps the link. She switches back to JoyR1der, and a few seconds later the app opens as normal.
Sign in, and reset a forgotten password
- On Sign in to your account, type your email and password.
- Tap Sign In, or use the Google or Apple button if you signed up that way.
Forgot your password? Type your email address first, then tap Forgot password?. The app says "If an account exists for that email, we've sent a reset link." Open the link to choose a new password. If you signed up with Google or Apple, use that button instead.
Browsing as a guest
On the sign-in screen, Browse as guest lets you look around without an account.
- As a guest you see Discover and event pages, filled with sample events rather than the real feed.
- You can't join events, post, message, buy Clicks or open your profile. Other pages send you to sign in.
- The Posts feed shows a few posts and then Sign up or sign in to view more posts.
- Tapping Messages, Following or You in the dock shows a short sign-up prompt. For example, You shows Your profile — "Set up your profile, wallet and settings — free to join." Tap Join free to sign up, or Not now. Discover and Search work as a guest.
- The Sign In / Up button at the top right takes you to the sign-in screen.
The free selfie age check
Some things need a quick selfie that confirms you are an adult. It is free and takes a moment. The app asks for it the first time you try one of these things, so you don't need to do it in advance. You can also do it any time from You › Age check & ID.
- Try something that needs the check, or tap Age check & ID on the You page. The Quick age check screen opens.
- Read how it works. Tick I have read the above and give my written consent to these face scans, used only to estimate age and confirm a live person.
- Tap Take a selfie and follow the camera prompts.
When it passes, the app takes you back to what you were doing. The Age check & ID row on You then reads "Age confirmed with a selfie". The photo is not stored.
- Rather not scan your face? Tap Verify with a government ID instead. "If there's a fee, you'll see it before you pay."
- If the selfie can't confirm you are 18 or over, you see We need a quick ID check and Continue to the ID check. There's no charge for that ID check.
- After too many tries you see "Too many attempts. Try again in an hour, or verify with a government ID instead."
- The full ID check, what it unlocks and the daily limits are in Staying safe & verifying.
Tom joins a quiz night with his welcome Bonus Clicks and chats in the event straight away. When he taps Tip, the app opens Quick age check. He ticks the consent, taps Take a selfie, and is taken back to send his tip.
Getting set up: guided walk-throughs
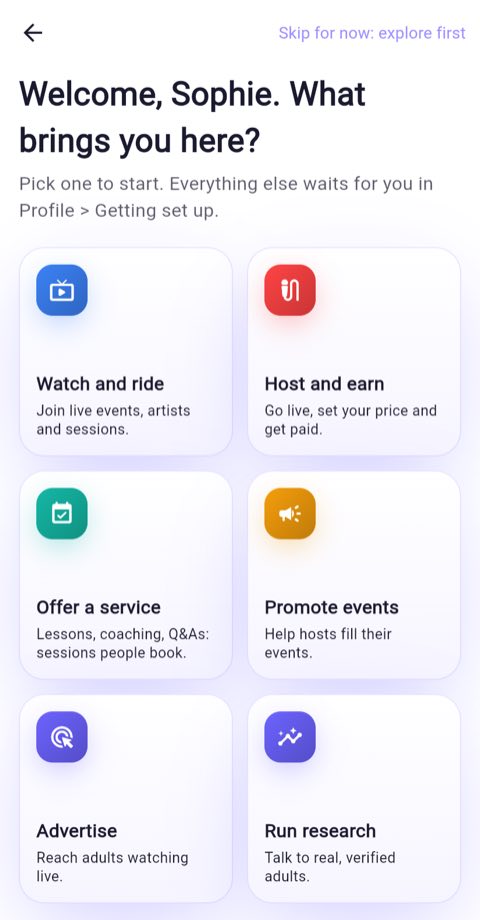
Getting set up is a set of short guided walk-throughs. It opens by itself once on a new account (accounts under 14 days old). After that it lives at You › Getting set up, with your progress saved on every device.
- On "Welcome, {your name}. What brings you here?", pick a goal: Watch and ride, Host and earn, Offer a service, Promote events, Advertise or Run research.
- Tap Start on the walk-through it suggests, or tap See everything for the full list.
- Not ready? Tap Skip for now: explore first. "Everything else waits for you in Profile > Getting set up."
The walk-throughs, by their titles in the app:
The Watch and ride goal suggests Ride your first live event and Request a ride. The page also has a Good to know part, which explains how Clicks pay for everything.
On her first day, Priya picks Watch and ride and starts Ride your first live event. She picks two interests, follows three hosts, turns on notifications and sets a spend alert. At the end she taps Browse Live Now to find something to join.
Clicks and Bonus ClicksHow paying works inside the app.
Inside JoyR1der you pay with an in-app credit instead of your card. You buy it once, then spend it on rides, tips and purchases.
Where Bonus Clicks come from, and where you can spend them
- Welcome: a one-time welcome of Bonus Clicks when you join (currently 250).
- Daily Bonus Drop: the first time you open the app each day you get 25 Bonus Clicks, or 150 on every 7th day in a row. A pop-up tells you.
- Referral Bonus: 200 Bonus Clicks each for you and a friend you invited, after their first paid ride (see Rider on the You page).
- Membership tiers add Bonus Clicks every month (see Membership tiers).
Bonus Clicks pay only where a host has switched on Accepts bonus. Look for the Accepts bonus pill on an event, a person, a piece of content or a membership. A host can set it for each event, service, content item or membership. Bonus Clicks also pay for things JoyR1der sells itself, such as profile cosmetics. Everything else is paid in Clicks.
Where Bonus is accepted, your Bonus Clicks are spent first and your Clicks after that. You don't choose. Where Bonus isn't accepted, only Clicks are used. The terms you joined or booked with stay the same, even if the host changes the setting later.
- Bonus Clicks expire 30 days after you get them. Bonus Clicks paid to you as a host last 90 days. Your Wallet shows the current numbers.
- The welcome and drop amounts above are the current defaults. JoyR1der can change them.
- Only bought Clicks count towards your daily spending limit. Bonus Clicks don't.
Where your Clicks go
When you pay a host, JoyR1der keeps a 19% fee and the host keeps 81%. If the host works with a promoter, the promoter's share comes out of the host's 81%. It is never added to what you pay.
Dollars and Clicks
- On a phone you buy packs through the App Store or Google Play. The store shows the price in your currency before you pay.
- On the web you pay by card through Stripe. At the moment ℂ1,000 costs $13.50, and tax may be added where it applies. The checkout shows the exact amount before you pay.
- Daily limits are set in dollars and counted at ℂ100 = $1. For example, a $100 daily limit is ℂ10,000.
Maya has 200 Bonus Clicks and ℂ1,000. She joins a guitar lesson at ℂ50 a minute that shows Accepts bonus. Her first 4 minutes are paid from her 200 Bonus Clicks, then her Clicks take over. She stays 10 minutes in all, so she spends her 200 Bonus Clicks and ℂ300. Of the ℂ500 the lesson cost, the host keeps 81% and JoyR1der keeps 19%.
Finding your way aroundThe dock at the bottom, and the six chips along the top of Discover. Each chip has a menu of filters.
Five buttons sit in the dock at the bottom of the main screens. On a tablet or computer the same five run down the left side.
The Discover chips
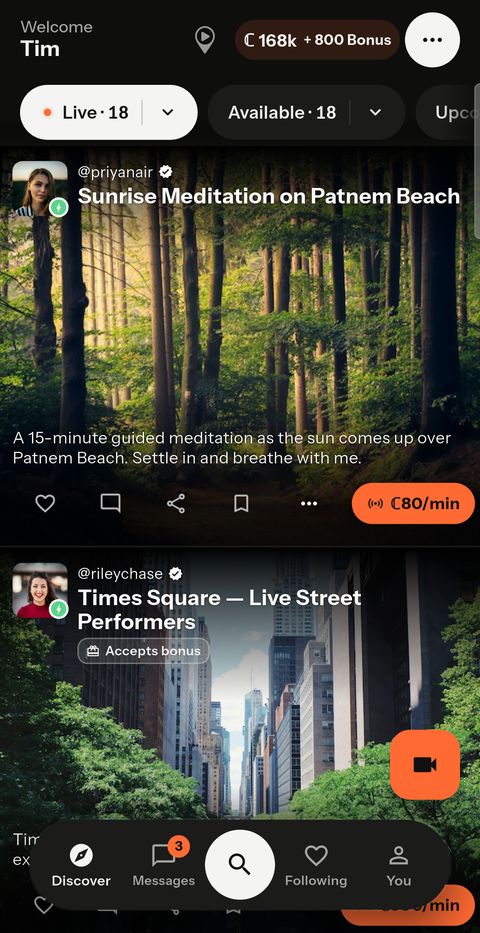
A chip's name adds its filter once you move off the default, as "Chip · Filter". For example, People opens on everyone and reads just People. Pick Friends and it reads People · Friends. Pick Past Events on Upcoming and it reads Upcoming · Past events. Each chip has a small chevron on its right: tap it to open that chip's menu. The row of chips scrolls sideways, so Content and Posts may sit just off the edge on a phone.
The top of Discover says Welcome and your first name. On the right are the Available Now button (the JoyR1der map-and-play mark; it turns green while you're available to ride; tap it to switch), your balance pill and …. The balance pill opens your Wallet. A dot on … means something needs you, such as a ride request.
Discover's "…" menu holds everything that used to sit along the top:
The chip menus (sub-categories)
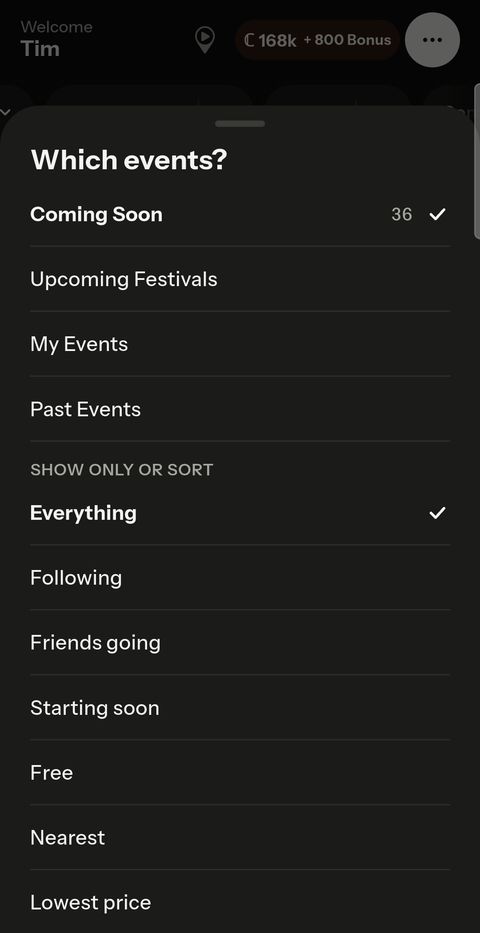
Each chip has a menu that changes what it shows. To open it, tap the chip's chevron, press and hold the chip, or tap the chip you're already on. The menu asks Which events?, Which people?, Which content? or Which posts?. Pick a row and the menu closes.
- Tap the chevron on Upcoming. Which events? opens.
- Tap the one you want, for example Upcoming Festivals.
Live
Upcoming
Available has one list, Available Now: hosts who are free to ride right now.
People
Content
Posts
My members, Memberships, Bought, Past I hosted, Replies and Reposts of my posts show only when you're signed in.
Show only or sort (Live, Available and Upcoming): Everything, or one of these. Pick it again to clear it.
Friends watching and Friends going cover recent friend activity on the first 60 events shown.
Free keeps only cards that read "Free ride". These are older events that were listed as free, and they now charge ℂ5 a minute when you join (see Join a live event). It doesn't pick out rides that are free just for you, such as with a free ride token or Ultra (see Ways to ride free).
Narrow it down, at the bottom of a menu where it applies:
Sam wants a fitness class this week that takes Bonus Clicks. He taps the chevron on Upcoming, which is on Coming Soon. Under Narrow it down he taps Category and picks Fitness. He opens the menu again and turns on Accepts Bonus. Then he taps Search in the dock, presses and holds Calendar, and picks This Week.
If an advertiser has bought a category, a banner may show at the top of Discover while you have that category picked.
Search, the map and the calendar
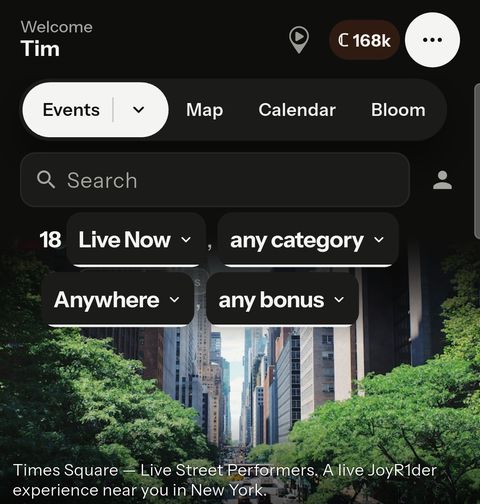
Tap Search in the middle of the dock. On Discover, the chips give way to the search bar. Tap Search again (it now shows ×) to close it. The filters you set stay on.
The top row reads, for example, Events ⌄ · Map · Calendar · Bloom. Under it is one search box, with the person icon beside it.
A dot on Map, Calendar or Bloom means a filter is set there. Tap the view you're on again to go back to the list.
The sentence above the results. When a filter is on, Discover says what you're seeing as a short sentence, for example "48 Live Now, near Bristol". Each underlined word is a menu: tap it to change that part, such as the chip's choice, the category, the time, the place (How far?) or Bonus. A button under it takes you back to the chip's first choice, or reads Search … to run the same search over everything. Other filters show as chips with a cross. Clear all clears them. Filters stay on, and their chips stay visible, after you close search.
Priya is visiting Lisbon. She taps Search in the dock, taps Map and types Lisbon in Search a location. The list now shows events within 50 km of Lisbon, and the sentence above it names the place. When she gets home she taps the place word and changes it back to Anywhere.
Card buttons and the "…" menu
Event cards have a row of buttons under them: Like, Comment, Share (each with its count), Save, and More ("…"). Live events also show their price to join. Tap … for Event actions:
- Like, Comment, Save and Share.
- Re-post (when the host allows it).
- Locate on map (when the event has a place).
- Take a peek (live events, on some screens).
- Add to calendar (any event with a start time).
- Edit event (only your own events, or a group you manage).
- Report event, Report cover image, Mute host and Block host (not on your own events).
People cards have a Follow button, a chat button (Message for a friend, Send an enquiry for anyone else) and More. Posts have their own buttons (see Posts and messages).
Sam sees a comedy show on Friday. He taps … on its card, then Add to calendar, and then taps Save so he can find it again under his saved items.
Riding live eventsPeek, join, take part, leave, and book events that haven't started yet.
Open an event
Tap any event card. The event page shows the category, the host, the date and length, the seats left (if limited), the description and the price. You may also see an Accepts bonus pill, a pill that says you need more Clicks, or a pill that says you ride free with Ultra. The buttons at the bottom change with the event: live, about to start, upcoming or ended.
Take a peek before you pay
- Open a live event.
- In the phone app, tap 👀 Take a peek (it's also in the … menu). On the web there's no button: the peek plays by itself in the side panel.
- Watch. When your free time runs out the picture fades and you see Join to keep watching.
- Tap the Join button to pay and stay, or go back.
- You get 2 minutes of peeking per event in total.
- Members on No Ads or any higher tier can peek with no time limit (see Membership tiers).
- You can't peek at a solo ride or a private session.
- Cards in the feed also play a short silent preview as you scroll.
Sam isn't sure about a DJ set. He taps 👀 Take a peek, likes the music after a minute, and taps Join before his 2 free minutes run out.
Join a live event
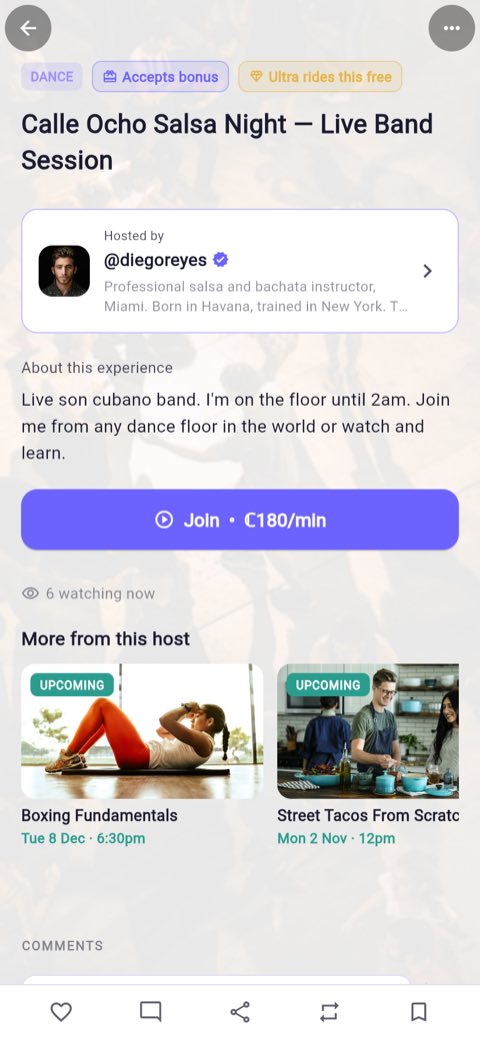
- On Discover's Live chip, tap an event with a red LIVE badge.
- Check the price on the button. A per-minute event reads Join • ℂ130/min, for example.
- Tap Join. On most paid per-minute events, Ride along shows the rate and about how long your balance lasts. Tap Join now.
- If the host is recording and you may appear on video, you see Before you join. Tick the consent and tap Agree & enter stream, or tap Leave.
You are in the event. Billing starts once the host's video reaches you. Your rate and what you've spent so far show on the ride meter the whole time.
- To join a per-minute event you need at least one minute's price. If you're short, the button reads You need more clicks to ride — Get Some, which opens Buy Clicks.
- A ticket event takes its price once, when you join. There is no per-minute charge after that.
- Some events lower the price as more riders join. A message tells you when your rate changes.
- Older events that were listed as free now charge ℂ5 a minute.
- Members-only events need a membership of that host. The page shows Subscribe to join instead (see Ways to ride free).
- Bonus Clicks count only when the event shows Accepts bonus.
Maya opens a live guitar lesson at ℂ130 a minute and taps Join • ℂ130/min. She stays 12 minutes and leaves. She pays for 12 minutes: ℂ1,560.
Taking part in a live event
The bar at the bottom has Say something, a heart and Tip. Tap ⋯ at the top to open Stream tools, with every tool in groups: Join in, Your ride, Watch, Safety (Help and Report) and Display. Press and hold a tool there to pin it to the side.
- Tips need the free selfie check. They come out of your balance straight away and count towards your daily limit.
- You can only tip during the event, while you're in it.
During a cooking class, Ana asks a question in the chat. Later she taps Tip, taps Other, types 20 and "thanks!", and taps Send ℂ20 tip. When the host turns on her mic, she taps Mic to talk.
Going private with the host
Some hosts can take a live stream private. If they offer it you may see Reserve private seat with a price, or Go private in the tools.
- Tap Reserve private seat and then Reserve. You are not charged now.
- Or tap Go private and then Ask the host. Your request lasts 2 minutes.
If the host takes the stream private with you, you pay the seat price as you go in, then the private rate per minute. If the host never goes private, you pay nothing.
Kim reserves a ℂ50 private seat during a fitness stream. The host never goes private, so Kim pays nothing extra.
When the price goes up during a ride
If the rate rises above the most you've agreed to pay, your video pauses and you see Price changed. You are not billed while it's paused. Choose Accept · ℂ…/min to carry on at the new rate (this needs the free selfie check), Raise my limit to accept rises like this in future, or Leave. If you don't answer in time, you are taken out of the ride.
Leave an event
- Tap the red leave icon, or End ride on your ride meter.
- On Leave session?, read what you'll be charged.
- Tap Leave, or Stay to carry on.
Billing stops. The Thanks for riding! screen shows Charged for riding, Tips given and Duration. Under How was your host? you can give 1 to 5 stars. You can also tap Something wrong? Request a refund, or Rejoin Event while it's still on.
The back gesture and Minimize shrink the event to a small pill so you can look around. You are still in the ride and still paying. Tap the pill to go back, and use the leave icon to stop paying.
- On a per-minute event you pay for the minutes you were in.
- A ride you booked with a host can have a minimum length. If you leave before it, Leave session? tells you: "This ride has a 15-minute minimum. Leaving now charges the rest of it — about ℂ… more." See Deposits, minimums and no-shows.
- After 15 minutes, and then every 30, the app asks "Are you still there?" so you aren't billed for a ride you've walked away from. Tap Yes, I'm here. With no answer in 60 seconds the ride pauses and billing stops until you tap Resume.
After 25 minutes of an ℂ8-a-minute dance class, Ben taps the leave icon and then Leave. The end screen shows ℂ200 charged for riding, and he gives the host 5 stars.
One ride at a time
You can only be on one ride at a time. If you join a second while still on the first, you see You're already on a ride. Tap Go to that ride, or Leave it and join this one. Leaving ends the first ride as usual: you pay for the time you rode, and its minimum if it has one.
Mo minimized a quiz and then opened a music set. He taps Join and sees You're already on a ride. He taps Leave it and join this one, pays for his quiz minutes, and joins the music set.
Reserve a spot or buy a ticket for a later event
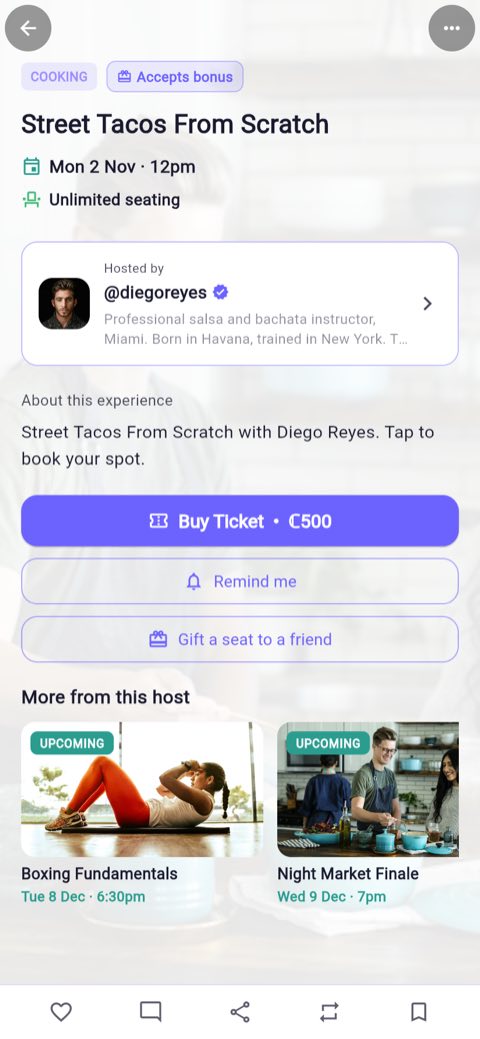
- Open an event that hasn't started.
- Tap Reserve Spot (per-minute events) or Buy Ticket • ℂ… (ticket events).
- Check the amount and your balance. If you're short, tap Buy Clicks.
- Tap Confirm & Book.
- On Booked! ("You'll be notified when … goes live."), tap Done.
The event is added to your Upcoming Rides. You get reminders 15 minutes before, 5 minutes before, and at the start. From 5 minutes before the start you can wait in the lobby with the other riders.
- Ticket event: the whole ticket price, now.
- Per-minute event: a deposit of 10 minutes at the event's rate, now. It keeps your spot. When you join, it comes back to you, and your minutes are charged as you ride, like any per-minute event.
- Bonus Clicks can pay only if the event accepts Bonus and they won't expire before the event.
- Cancel your Booking before it starts and you see "Booking cancelled — any held credits refunded."
- If the host is late or the event is being cancelled, a card offers Decline & get a full refund.
- If you don't join: once the event has really run without you, your ticket or deposit goes to the host, and you get a "Booking unused" alert. An event has really run if the host was live for at least 75% of its scheduled length, counted from its scheduled start and not counting time it was paused (or at least 5 minutes, when it has no scheduled length). Cancelling after that counts the same. While a timed event is under way and hasn't reached 75% of its length, you can't cancel (unless the host has dropped out, or twice its length has passed since its scheduled start, or since the host went live if that was later): you see "This event is under way. If it runs most of its length your booking goes to the host; if not, you're refunded automatically." You get your booking back if the event doesn't really run, the host cancels, the host moves the start time after you booked, or the host's settings (private, one-to-one, members-only, 18+ or a block) keep you out.
Maya's one-off jam session on Friday costs ℂ13 a minute. Sam taps Reserve Spot and Confirm & Book, and ℂ130 (10 minutes) is taken. On Friday he joins: the ℂ130 comes back, and his minutes are charged as he rides. Had he tapped Cancel your Booking before it started, the ℂ130 would have come back too.
Remind me
- Open an upcoming event.
- Tap Remind me. It changes to Reminder set ✓.
It's free and nothing is held. The event shows in your schedule, and you get a notification 15 minutes before, 5 minutes before, and when it's due to start. Tap the button again to turn the reminder off. A weekly event also has Remind me for every show.
Lily taps Remind me on Thursday's open-mic night. At 7:45 pm she gets "Starting in 15 minutes", and at 8 pm "Starting now".
Join a waitlist
When an event with limited seats is full, the button reads Sold out — Join waitlist (with the number waiting, if any).
- Tap Sold out — Join waitlist.
- You see "You're #2 on the waitlist — we'll notify you when a seat opens", for example.
It's free and no seat is held. When a seat frees up, the first person in line is notified and needs to book it before someone else does. Tap Leave waitlist to drop out.
A pottery class is full. Dev joins the waitlist as #2. Two people cancel, he gets a notification, and he books a seat straight away.
Weekly classes and class passes
A weekly class can be booked one class at a time, or with a pass for every class still to come.
- Open the class event.
- Tap Pass for all … classes · ℂ… (or Pass for the … classes left once the series has started).
- On Buy a pass?, check the price and tap Buy pass.
You see "Pass bought — you're booked into every class it covers." Each class then shows "Your pass covers this class". Your passes are in You › Rider › My Class Passes.
No refund if you cancel or miss a class. If the host cancels, skips or doesn't run a class, you get that class's share back. Cancelling a class you booked asks Cancel this class? with Cancel, no refund or Keep my seat.
Ivy buys a pass for 6 Tuesday pottery classes for ℂ1,200. The host skips one week, so that class's share, ℂ200, comes back to her.
Ways to ride free, and members-only events
Join a host's membership
Some hosts offer a monthly membership. Members get the host's members-only events, a member badge, chat replies, longer live-time in chat and the host's member emotes. A Deluxe plan adds a gold badge, 60 more seconds of chat live-time and the host's private Deluxe chat.
- Open the host's profile. Tap their name or photo, or the Become a member tag on one of their event cards.
- Scroll to Membership. Each plan shows its name and its price a month.
- Tap Subscribe — ℂ…/mo on the plan you want.
- In Subscribe to {name}, check your balance, then tap Subscribe — ℂ…/mo again. Short of Clicks? You see "Not enough Clicks for this month. Top up to subscribe." Tap Top up Clicks.
You see "You're now a {plan} member!". The membership renews each month from your Clicks balance. Manage or cancel it in You › My Subscriptions; you keep access to the end of the month you've paid for. It needs the free selfie check. Bonus Clicks count only if the host's memberships accept them.
Ana loves Kai's Sunday jazz streams. On Kai's profile she taps Subscribe — ℂ300/mo on his "Member" plan and confirms. She can now join his members-only Friday sessions, and her name shows a member badge in his chat.
Spend alerts and the auto-leave limit
- Go to You › Rider › Spend Alerts & Limits.
- Under "Get a heads-up in a stream when your spend reaches:", tick any of ℂ100, 200, 500, 1,000, 2,000 or 5,000.
- Turn on Auto-leave at a spend limit. It starts at ℂ1,200.
- Type your own amount in Limit: ℂ. It saves when you finish typing.
In a stream you get a message at each amount you ticked. Near your limit you see Spend limit approaching: raise the limit for that stream only and tap Stay, or tap Leave stream. At the limit the app takes you out of the stream.
The lowest limit is ℂ100. Clear the box to turn auto-leave off. This is your own limit, separate from the daily limit in Staying safe.
Zoe ticks ℂ200 and ℂ500 and keeps the ℂ1,200 auto-leave. In a long music set she gets a warning near ℂ1,200, raises the limit to ℂ1,700 for that stream and taps Stay.
Rides and bookingsRide with a host who is free now, ask for something custom, or book a service for later.
A ride here means time with a host that you ask for, rather than a public event that's already on. Sending a request is free. Clicks are held only when a host accepts.
Ride Now: one tap with a host who is free
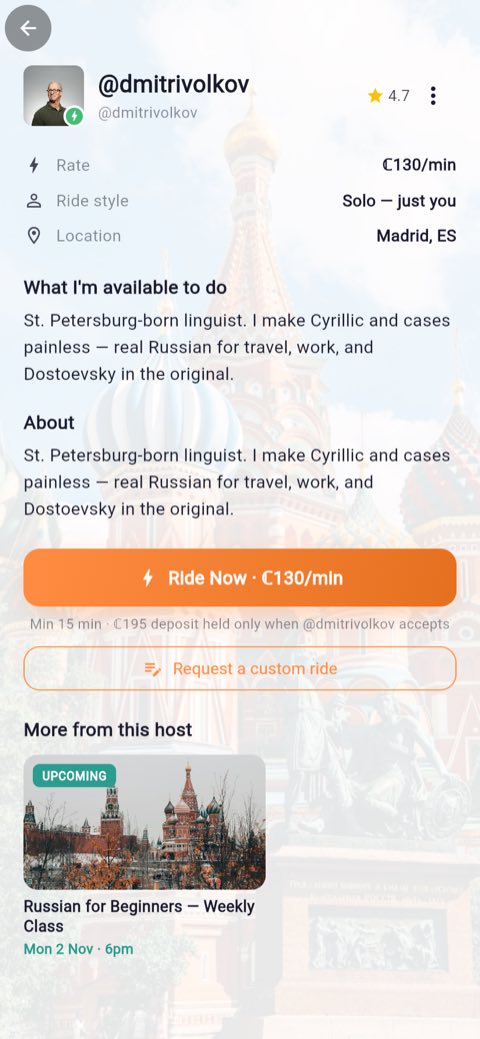
- On Discover's Available chip, tap a host's card, or the green AVAILABLE pill on a person card.
- Read the line under the button, for example "Min 15 min · ℂ18 deposit held only when Alex accepts".
- Tap Ride Now · ℂ12/min (the host's rate).
- The button turns into Waiting for Alex with a countdown. Tap Keep waiting for more time, or Cancel.
- If the host suggests a change, tap Review (see Agreeing the terms).
When the host accepts you see "Alex accepted — joining…" and go into the lobby. The deposit is held then.
- The host has 3 minutes to answer. Each Keep waiting adds another 3, up to 15 minutes in all.
- The deposit is a tenth of the estimate. For a per-minute ride, the estimate is the rate times the longer of the length you booked and the host's minimum (15 minutes unless the host set another).
- You can wait on one host at a time. Cancel that request to ride with someone else; it's free until a host accepts.
- You can send up to 20 ride requests an hour.
- If the host declines or doesn't answer, you see Find another host and Schedule with ….
Sam opens Alex, who is available at ℂ12 a minute with a 15-minute minimum. The deposit line says ℂ18 (a tenth of ℂ180). Sam taps Ride Now · ℂ12/min, taps Keep waiting once, and Alex accepts. ℂ18 is held and Sam lands in the lobby.
Ask one host for a custom or later ride
- Open the host's availability page, and tap Request a custom ride (if the host takes custom requests) or Schedule a ride. You can also open the host's profile, go to the Services tab and tap Book on "Request a Ride".
- For a custom ride, fill in Describe what you'd like.
- Set the rate (or fee) and the length. Both must be at least the host's.
- To ride later, turn off I want to ride now. Tap times on the host's calendar (you can suggest up to 8), or pick a date and time.
- Tap Send request (now) or Send booking request (later).
A ride-now request waits for the host like Ride Now. A later booking either confirms at once ("Booked! … is confirmed and your deposit is held.") when the host auto-accepts, or says "Booking sent to … — you'll be alerted when they accept."
- A later booking needs at least 30 minutes' notice.
- For a later ride, the deposit is held about an hour before the start. Keep it in your balance, or the booking is cancelled.
- A booking the host hasn't answered expires 15 minutes before its start.
- Rates are whole Clicks.
Priya wants a 40-minute guided walk instead of the host's standard ride. She taps Request a custom ride, describes the walk, keeps the host's ℂ10 a minute, sets 40 minutes, turns off I want to ride now and suggests two evening times. The host auto-accepts, so she sees "Booked!". Her ℂ40 deposit is held about an hour before.
Request a Ride from every matching host
- On Discover's Available or People chip, tap the round Request a Ride button in the corner. Or tap … on Discover and then Request a Ride.
- Fill in What would you like?
- Keep I want to ride now on, or turn it off and tap Pick date & time.
- Under Your offer, choose Per minute or Fixed. Enter the rate or fee and Duration (min) (30 to start).
- If you like, set Where (optional) and a host gender.
- For a ride now, pick up to 5 hosts from the list, or pick none.
- Tap Send request or Send to … hosts (now), or Schedule request (later).
You see Request sent. "No Clicks are held until a host accepts." The first host to accept gets the ride.
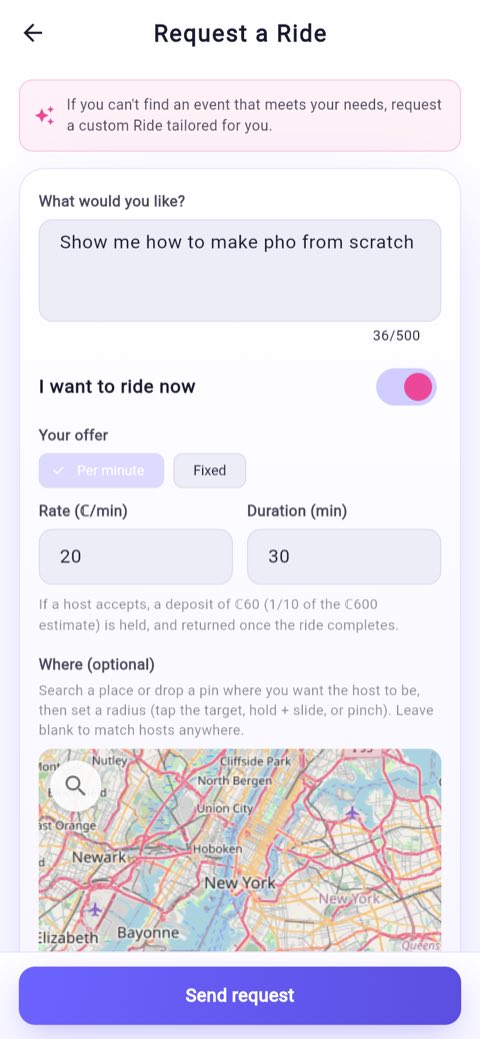
- The host list shows only hosts who are free now and take custom requests. Hosts your offer doesn't reach are greyed out.
- Pick nobody and a ride-now request goes to every matching host, up to 50.
- A request for later goes out about an hour before your time, to hosts whose hours cover it.
- You can have one open request like this at a time.
- The form shows the deposit, for example "If a host accepts, a deposit of ℂ24 (1/10 of the ℂ240 estimate) is held, and returned once the ride completes."
Jo wants someone to show them a market in Lisbon right now. Jo describes it, offers ℂ8 a minute for 30 minutes, drops a pin on the market and picks no hosts. Every matching host who is free gets it, and the first to accept gets the ride. The deposit is ℂ24.
Book a host's service
- Open the host's profile and tap the Services tab.
- On the service you want, tap Book.
- Check the price. Members of the host may see a lower member price.
- For a Private group service, set Seats. You can give seats to friends now with Assign seats now (optional), or later.
- Check the timezone line, then tap one or more free times.
- Tap Confirm booking (when the host confirms at once) or Send booking request.
You see "Booked! Your … with … is confirmed." or "Booking request sent to …". The host decides the style of each service; you don't pick it.
- Join to book means the service is for the host's members only.
- Not bookable yet means the host hasn't published their hours.
- A booking needs at least 30 minutes' notice.
Mia books a host's "30-minute portrait tips" Solo service. She taps two free times on Saturday and then Confirm booking. The host confirms bookings at once, so she sees "Booked!" and a deposit is held straight away.
Agreeing the terms
Either you or the host can suggest a different price, length or time. Whoever needs to answer sees Your turn.
- Open the request from the alert, from My Requests, or with Review.
- Tap Accept, and confirm on Accept these terms? if asked.
- Or tap Suggest a change, edit the terms and send them.
- Or tap Decline and confirm on Decline these terms? ("This ends the negotiation. You can always send a new request.").
On Android the notification itself has Accept, Suggest a change and Decline buttons. They open the request; an Accept from there asks you to confirm first.
Each turn has a clock: 10 minutes for a ride now, and up to 12 hours for a later start. A counter-offer can't go below the host's rate or minimum length. After many turns the app asks you to accept, decline or start a fresh request.
Ana offers ℂ8 a minute. The host suggests ℂ10 for 20 minutes. Ana taps Accept on the notification, sees Accept these terms? with a ℂ20 deposit, and confirms. The ride is booked.
Deposits, minimums and no-shows
- Deposit: a tenth of the estimated price. It's held when the host accepts (or about an hour before a later ride) and comes back when the ride ends, less any part of a minimum your balance couldn't cover.
- Minimum length: a ride booked from a host's listing (Ride Now, a custom or scheduled ride) can have a minimum, never longer than the length you agreed. You pay it only if you tap Leave early while the host is still live. If the host ends the ride or the connection drops, you pay only for the minutes used. Services and group rides have no minimum.
- Ticket-price rides: billed by the minute but never more than the agreed fee. Near the end you see "1 minute left — you won't be charged beyond ℂ…".
- If you don't show: if you don't join within 5 minutes of a live start, the deposit goes to the host.
- If the host doesn't show: if the host isn't live within 15 minutes of the start, your deposit comes back ("Your host didn't show").
Kim books a 20-minute ride at ℂ10 a minute with a host whose minimum is 15 minutes. The deposit is ℂ20, a tenth of ℂ200. Kim leaves after 6 minutes, so Leave session? warns about 9 more minutes, about ℂ90. Kim pays ℂ150 in all, and the ℂ20 deposit comes back.
Cancel or move a booking
- Open My Requests (or the request from its alert).
- Tap Cancel, then Cancel request on Cancel request?. Or swipe the request left.
- To move it instead, tap Reschedule, pick a new time, and tap Reschedule on Reschedule this booking?.
- Before any host accepts: "No host has accepted yet, so there's no penalty."
- After a host accepts: "Free to cancel until your host goes live. Your deposit is refunded in full."
- Once the host is live there is no Cancel button, only Join lobby.
- A new time waits for the host to confirm: "Reschedule requested — waiting for the host to confirm the new time." Your old slot is released.
- Within the last hour before a booking you can cancel it but not move it. A private group booking can't be moved; cancel it and book again.
- If the host cancels, your deposit always comes back.
Leo booked a ride for 7 pm but needs 8 pm. At 3 pm he opens My Requests, taps Reschedule, picks 8 pm and confirms. His 7 pm slot is released, and the host gets the new time to approve.
Private group seats
- Go to You › Rider › My Group Seats.
- Under the session, tap Assign on an empty seat (or Give to a friend on your own).
- Search your friends and tap Give the seat.
You see "Seat given to … They'll get the session alerts." Everyone joins on their own device. Tap Unassign to take a seat back.
- Seats can only go to friends: people you follow who follow you back.
- Seats can change until the session starts.
- A seat nobody uses, yours included, is paid to the host.
- If the session never happens, what you paid for the seats comes back.
Ravi books a 4-seat private cooking session and keeps seat 1. He gives seats 2 and 3 to two friends. Seat 4 isn't used, so it's paid to the host when the session ends.
Keep track: My Requests
Open You › Rider › My Requests, or My requests under Your requests in Discover's … menu. Each request shows where it stands (for example Pending, "Change suggested", Scheduled, Accepted or "In progress") and the buttons you need. Tap a request ("Tap to view →") for the full history. Declined, expired and cancelled requests move to your Alerts.
At the bottom, Past rides — charges you can dispute lists rides where your deposit went to the host or paid a minimum. You can ask for a refund there for 24 hours (see Ask for a refund).
Buying Clicks, your Wallet and refundsTop up, check what you've spent, and ask for your Clicks back.
Buying Clicks needs the free selfie check. The first time you buy, the app asks for it before showing the packs.
Buy Clicks on a phone
- Tap your balance pill at the top, or Top up on the You page, or You › Wallet › Buy Clicks.
- Pick a pack: ℂ1,000, 2,000, 5,000, 10,000 or 20,000. Each shows its store price.
- Tap Buy for … (the price).
- Confirm in the App Store or Google Play.
The Clicks are added as soon as the store confirms the purchase. If the store asks someone to approve it first, you see Waiting for approval.
Buy Clicks on the web
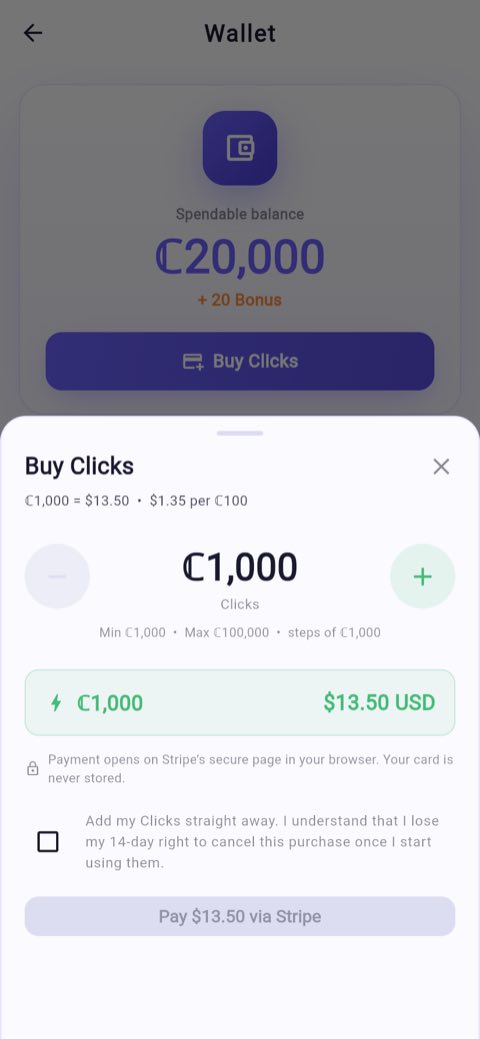
- Open Buy Clicks the same way.
- Use − and + to choose an amount, in steps of ℂ1,000.
- Tick Add my Clicks straight away. I understand that I lose my 14-day right to cancel this purchase once I start using them.
- Tap Pay $… via Stripe and pay by card on Stripe's page.
The Clicks are added once the payment goes through.
- On the web you can buy from ℂ1,000 to ℂ100,000 at a time. At the moment ℂ1,000 costs $13.50, and tax may be added.
- There's a daily limit on buying and spending. If you reach it, the app says so and offers Verify ID to raise it. The limits are in Staying safe & verifying.
- Clicks you buy can't be cashed out.
Ade, on his laptop, taps + twice to reach ℂ3,000, ticks the box and taps Pay $40.50 via Stripe. After paying by card, ℂ3,000 is in his balance.
Your Wallet
Open it from the balance pill or You › Wallet.
A note under the list explains how long your Bonus Clicks last.
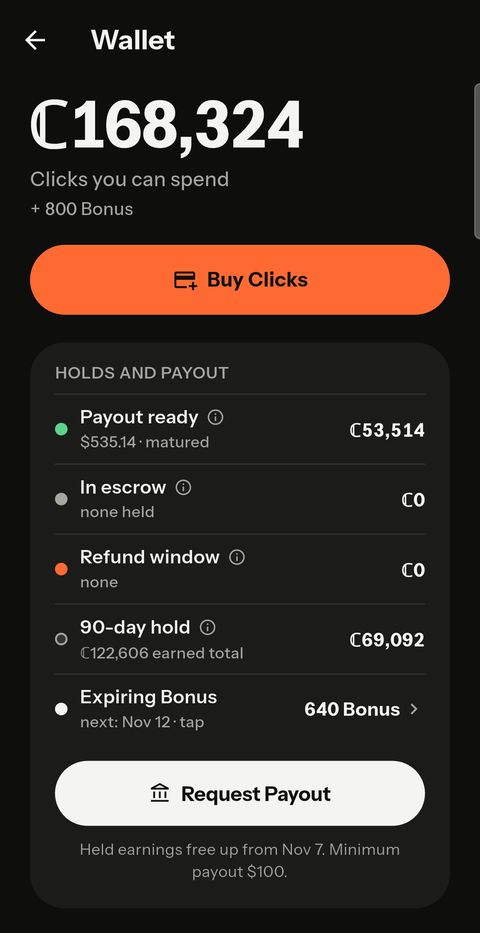
Ade opens Recent activity and sees his ℂ3,000 purchase, two tips, and his Daily Bonus Drop, each in plain words.
Ask for a refund
You can ask for a refund on most things you paid for: an event, a ride's deposit or minimum, a group seat, a gifted seat, a festival pass, or content you bought.
- Find Request a refund. It's on the Thanks for riding! screen ("Something wrong? Request a refund"), in My Requests under "Past rides — charges you can dispute", in My Group Seats, and next to items in My Purchased Items.
- Pick a reason: Misleading event description, Offensive / inappropriate content, Host didn't deliver what was promised, Technical / quality problems, Accidental purchase, or Other.
- Add a note in Anything to add? (optional).
- Tap Submit request.
The Clicks you paid are paused, so neither you nor the host gets them while it's decided. The host can respond within 3 days. If they don't, a request worth ℂ200 or less is approved automatically, and staff decide bigger ones. Track it at You › Refunds, under "In progress" and "Decided in the last 30 days".
- For an event, you can ask until 24 hours after its scheduled end.
- For content, until 24 hours after you bought it.
- For a ride's no-show or minimum charge, until 24 hours after the charge.
- You can cancel your request with Cancel my request. If you withdraw a request, you can ask again once while the window is open.
- Think a decision is wrong? The Refunds page gives an email address to write to.
- The 3 days and ℂ200 are the current settings and can change; the sheet always shows the current numbers.
Ade joined a ℂ150 comedy show, but the stream froze after a minute. On the end screen he taps Something wrong? Request a refund, picks Technical / quality problems and taps Submit request. The host doesn't respond in 3 days, and the ℂ150 is under ℂ200, so it's approved automatically.
Posts, comments, friends and messagesShare updates, react to others, follow people and talk privately.
Write a post
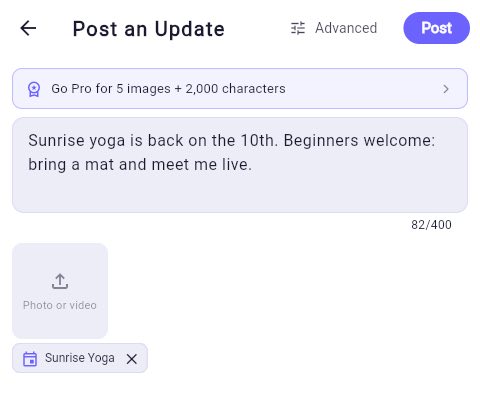
- On Discover's Posts chip, tap the round New post button in the corner. Or tap … on Discover and then Post. Post an Update opens. On a computer or tablet it opens in the right-hand panel.
- Write your post under What's new?
- Tap Photo or video to add a photo, or a video of up to 2 minutes. Adding either needs the free selfie check. Once a photo is attached, or when video posts are switched off, the tile says Photo and adds more photos.
- To link an upcoming event or one of your services, tap the link icon. It only shows when there is something to link. A post links one event or one service, not both. To swap it, tap the linked item and pick another; to remove it, tap its x.
- Tap Advanced (top right) for more: a Title (optional) of up to 40 characters with no links, Post as if you're in a Team or Organisation, Categories (optional) (up to 3), and Sensitive content for a post that is graphic or upsetting, such as news or injury.
- Tap Post. To share it afterwards, use the share icon on the post, as for any post.
Your post shows in the Posts feed and to your followers. Your next post starts as whoever you last posted as. When that's a Team or Organisation, Posting as shows its name above the text. A Team post can link any of the Team's upcoming events. An Organisation post can link any of its upcoming events if you own the Organisation or are its promoter; otherwise only the ones you host. Services are yours alone, so a Team or Organisation post can't link one.
- Free accounts: 400 characters and 1 photo. Pro, Premium and Ultra: 2,000 characters and 5 photos.
- Posts on a free account expire. A post starts with 3 hours. Likes, comments, reposts and shares add time, up to 12 hours, and a post that fills its 12 hours can stay up to 24. Posts by Pro, Premium and Ultra members, or with Eternal Posts, never expire (see Membership tiers).
Priya posts "Sunset run along the river tonight" with one photo and the category Fitness. It stays up for 3 hours, and gets more time as friends like and comment on it.
Like, comment, repost, save and share
Under a post in the feed are Like, Comment, Share and More ("…").
- Tap Comment. Type under Add a comment… (or Add a reply… in a thread), up to 600 characters, and send.
- To repost, tap … and then Repost. Add a comment in Repost with comment (optional) if you like, and tap Repost.
- To keep a post, tap … and then Save. Find it later under the Posts chip's Saved.
- Share opens the share sheet. At the top, Send in JoyR1der lets you send the link to recent chats, groups, friends, followers and subscribers: tap people to pick them (up to 50), tap More… to search or switch between Recent, Friends, Followers and Subscribers, add an optional message, then tap Send to and the number you picked. Someone who has turned off new messages can't be picked. One send can start up to 10 new chats with people who aren't your friends, and these count toward your daily limit of 30 new chats (see Posts and messages). Below that, share to other apps, copy the link or use your phone's share sheet.
On someone else's post, … opens Options: Not for me, Repost, Save, Report, Mute and Block. On your own post it has Repost, Save, Edit post (which can also change or remove its linked event or service), View edit history (once edited) and Delete post.
Text comments need nothing extra. A comment with an image needs the free selfie check. Reporting, muting and blocking are explained in Staying safe.
Leo comments "Great route!" on Priya's running post. Then he taps …, Repost, adds "Join us next week" and taps Repost. It shows in his followers' feeds.
Follow people and make friends
- Open someone's profile, or find their card on Discover's People chip.
- Tap Follow.
Their posts show in your Following feeds. There are no friend requests. When two people follow each other, they become friends. Friends can message each other freely, video call, and receive your group seats. To unfollow, tap the Following icon and confirm Unfollow?; this also ends the friendship.
Leo follows a guitar teacher he likes. She follows him back, so they're now friends and show in each other's People · Friends.
Messages
Tap Messages in the dock. Everything waiting for you is in one list, with anything that needs you now at the top. The line at the top reads Showing Everything: tap the underlined word to show only Chats, Alerts, Enquiries, Host requests, My rides or Calls. Use Search people by name to find a chat. … has New message, New group, Notification settings and Appearance.
- To start a chat, tap the round new-chat button in the corner, or tap the chat button (Message) on a friend's card on Discover's People chip.
- To message someone who isn't your friend, open their profile and use the Send a message box ("You can message … to enquire — no need to be friends."). Or tap Send an enquiry on their card.
- Type and send. Up to 2,000 characters.
A message to a non-friend arrives in their Enquiries. They choose whether to reply.
You can start up to 30 new chats a day with people who aren't your friends (the day resets at midnight UTC). Chats you already have, and chats with friends, don't count. When you reach the limit, the app tells you; try again the next day, or message people you already chat with.
- Starting a private message needs the free selfie check.
- To message a non-friend, they must have done the selfie and left Allow others to send me DM enquiries on (it's on unless they turn it off, in You › Rider › Privacy). If it's off, their profile says they aren't accepting messages from people they're not friends with.
- Calls are only between friends. They need the free selfie check. A video call fits up to 4 people: you and up to 3 friends.
Keeping or clearing messages. Messages are kept unless you choose otherwise. The bar at the top of a chat reads "Your messages don't expire · tap to change". Tap it to choose Disappearing messages for what you send: 24 hours, 1 hour, 5 minutes or No expiry. Each person sets their own. Delete for me hides a message on your side only, and you get a few seconds to Undo.
Ade wants to ask a cooking host about a private class. He opens her profile, types his question in the Send a message box and sends it. It lands in her Enquiries, and her reply shows in his Chats.
Notifications
Choose your emails and phone notifications in You › Settings › Notifications (more in Settings). The defaults:
Priya wants event ideas by email. She turns on News and offers, and Weekly events email starts working.
Creating thingsThe Create group in Discover's "…" menu, and the round shortcut button in the corner.
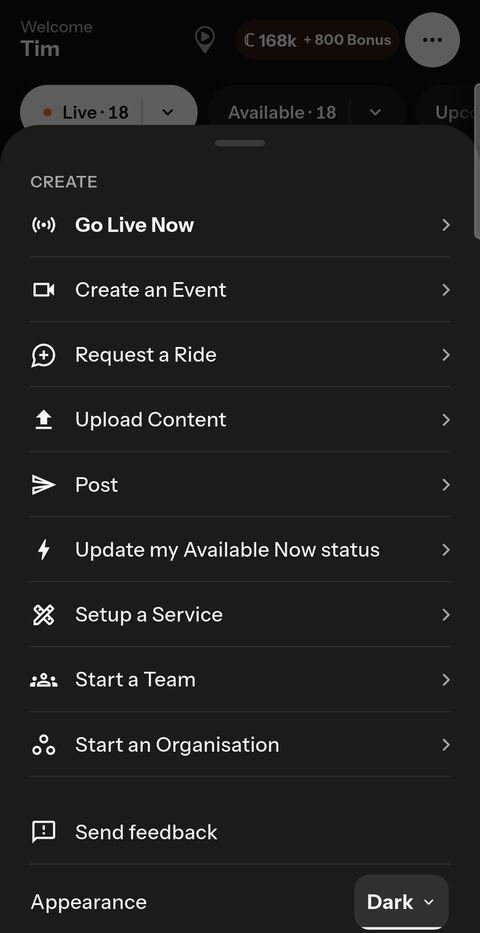
Tap … at the top right of Discover. The Create group lists everything you can make:
The round button in the corner is a one-tap shortcut for the chip you're on. It shows on the list, not on the map or calendar, and hides while the keyboard is open.
On Messages, the same corner button starts a new chat.
The Go Live page shows a preview of your live with one red Go Live Now button. If you belong to a Team or Organisation, Host as lets you go live as them. Create an Event and Request a Ride are at the bottom of the page. Going live needs the free selfie check. Hosting is explained in Hosting — creating events.
On the People chip, Sam taps the round Request a Ride button in the corner, and the form opens. Later, on the Posts chip, he taps New post to write a post. To start a Team, he taps … on Discover and then Start a Team.
Your profile: the You pageYour balance, your schedule, and every setting and list, in groups.
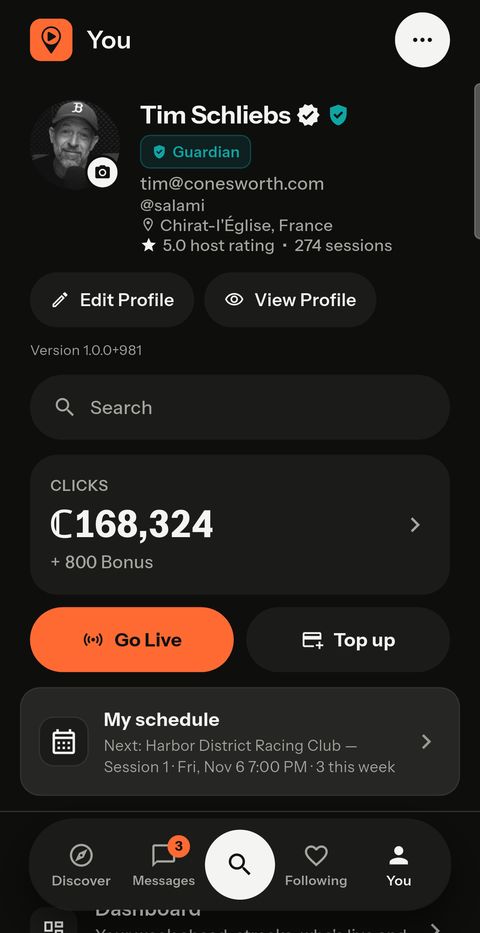
Tap You in the dock. The top bar reads You, with … on the right: Edit Profile, Change profile photo, Share profile, View Profile, Help & Support, Sign Out and Appearance (System, Light or Dark). Then, from the top:
- Your header: your photo, name and @username, with Edit Profile and View Profile (how others see you) under it.
- Search: "Search your stuff", just under your header. It finds your own things, such as your events, and any row on this page or in Settings.
- Your balance: "CLICKS" with your Clicks and "+ … Bonus". Tap it for your Wallet. Go Live starts a live; Top up opens Buy Clicks.
- My schedule: a card with what's next. Tap it for a calendar of the days you're hosting, riding or promoting.
Then the rows, in groups. Tap a group's name to open or close it. Activity & money, Account and Your roles start open. Some rows show only for some people; the list below says which.
Every row on the You page, in order
Activity & money
Account
Your roles — the roles you have. There are no switches here.
Promote & purchases
Groups
At the very bottom, on its own, is Sign Out. It asks Sign out? with Sign out (this device) or Sign out everywhere (your other devices are signed out within about an hour).
The Rider page
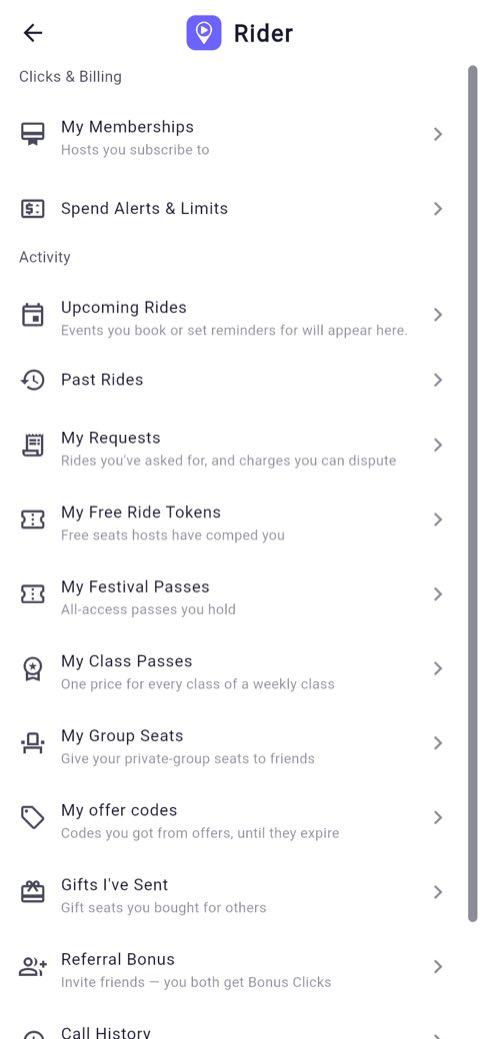
Tap Rider under Your roles.
Clicks & Billing
Activity
Priya invites Ade. She opens Rider › Referral Bonus and shares her link. Ade names her when he signs up. After his first paid ride, they each get 200 Bonus Clicks, and her screen shows "1 joined · 0 yet to ride".
The Host page (host rows)
Tap Host under Your roles. These rows are for hosting and are explained in Hosting — getting set up and Hosting — creating events. At the top is the Available Now switch. The rows are Create an Event, Host Requests, Upcoming Events, Past Events, Pending Approval (when something is waiting), Set Default Event Settings, Availability Schedule, Accept Bonus for rides, calls and tips, Promote me, Your services, Content Studio, Refund Requests, Free Ride Tokens, My Free riders, Notify Followers, Promotions (Boost), Languages I speak, Membership Plans and Linked Promoter.
Edit Profile
- Tap Edit Profile. Set up your profile opens on the Profile step.
- Tap the camera badge to add a profile photo (this needs the free selfie check).
- Set your Name (up to 80 characters) and Bio (up to 300).
- Set your location with Use this device or Use map, and check your timezone. Tap Yes, that's right if the guess is correct.
- Tap Next to go on, or Done at the top to save and leave.
The wizard has four steps: Profile, Live Now, Available Now and Event. If you only want to ride, the Profile step is all you need. The other steps set up hosting.
Sam adds a photo, writes "Weekend cyclist and amateur cook" in his Bio, taps Use this device for his location and Yes, that's right for his timezone. He taps Done to save.
Hosting: getting set upWhat a host sets up once, so going live later takes a tap or two. Most of it is in You → Host.
Every account can host from the day you join. There is no Host role to turn on. You find your host tools on the You page, under Your roles, in Host.
The first time you go live, turn on Available Now, accept a ride or publish content, the app asks for the free selfie age check. It takes about a minute. You don't need an ID check to host. You need it only to cash out your earnings (see Your earnings and payouts).
- Live Now: you are broadcasting right now.
- Available Now: you are free and waiting for a ride request. You are not broadcasting yet.
- Scheduled event: an event planned for a later time.
JoyR1der keeps 19% of what riders pay you. You keep 81%. The lowest price is ℂ3 a minute per rider.
The free selfie check
- Do something that needs it, for example tap Go Live Now.
- If you haven't done the check, you see Quick age check needed. Tap Do age check (or Later).
- Read the consent, tick the box and tap Take a selfie. If you'd rather not scan your face, tap Verify with a government ID instead.
- The first time you go live, the app also asks for Biometric data consent. Tick the box and tap Agree.
Priya has never hosted. She taps Go Live Now, and the app asks for the quick age check. She takes a selfie in good light and agrees to the consent. A moment later she is on the camera screen. Nobody asked her for an ID.
After the check passes, the same selfie also unlocks Available Now, your profile photo and publishing content. If the selfie can't confirm you're 18 or over, you are sent to an ID check, which is free for this purpose. If you decline the consent, you can't go live.
Your photo and bio
- Open You and tap Edit Profile.
- On the Profile step, add a photo and a short bio that says what you do.
- Tap Next to go through the host steps: Live Now, Available Now and Event. Or tap Done to save and close.
Leo teaches ukulele. He adds a photo with his ukulele and writes "Beginner ukulele lessons, every week". Riders see this on his profile and on his cards.
More about your profile is in Your profile.
Live Now defaults
These are the cover, title and price that Go Live Now uses when you go live without setting up an event.
- Open You → Edit Profile and go to the Live Now step. (Or tap Set your live defaults on the Go Live page.)
- Add a cover image and pick What you host.
- Type a Live title.
- Type your Price per minute (Clicks). The screen shows what each rider pays.
- Tap Done.
Sam plays guitar at sunset most evenings. He sets the title "Sunset guitar jam" and ℂ8 a minute. Now one tap on Go Live Now uses that title and price.
Go Live Now then uses "@yourname is live", ℂ10 a minute, the Music category and a public event. The price can't go below ℂ3 a minute. If your saved default event uses a fixed fee, the Live Now step shows that price and sends you to your default event settings to change it.
Default event settings
Save a template, so each new event starts filled in.
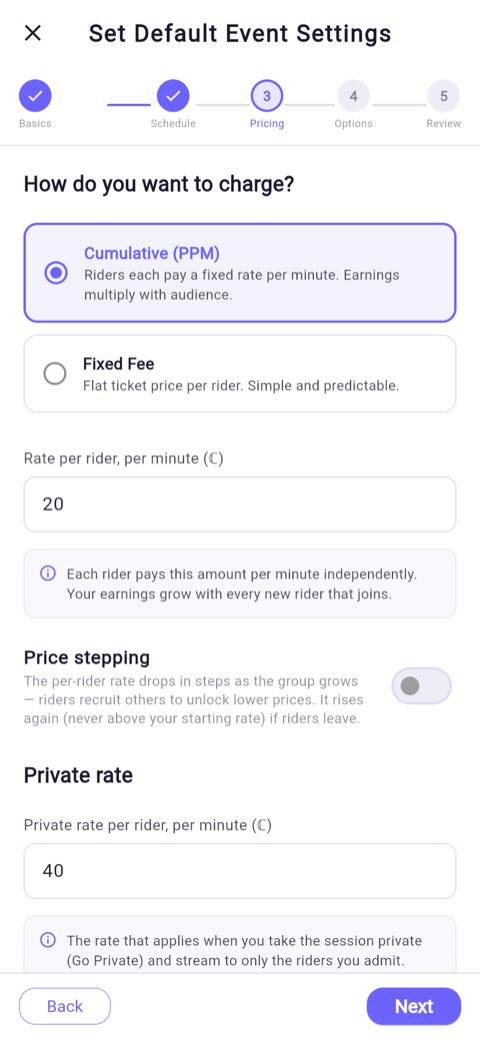
- Open You → Host → Set Default Event Settings.
- Go through the five steps: Basics, Schedule, Pricing, Options and Review. The steps are explained in Hosting live events.
- Tap Save as Defaults.
Kofi runs a jazz night every Friday at ℂ20 a minute. He saves that as his defaults once. Next time he opens Create Event, the Use my default event settings switch is on, and he taps Schedule for Later and picks the date.
You see "Default event settings saved!". New events start from these settings, and Go Live Now uses them too.
Your Available Now listing
This sets what you offer when riders can ask you for a ride right now. The page is called Available Now.
- Open it from You → Host by tapping the Available to host card. (Or Edit Profile → Available Now → Set up Available Now.)
- Add a cover image and fill in What are you available to do? (up to 400 characters).
- Under What you host, pick up to 3 categories, then tap Done.
- Choose a Ride style: Solo (private) or Open group (public). Riders see your choice but can't change it.
- Under Pricing, choose Per minute and type a Per-minute rate (Clicks), or choose Fixed and type a Flat fee (Clicks) and Duration (minutes).
- For an open group at a per-minute price, you can also turn on Price stepping (just above Pricing), so the price per rider drops as the group grows.
- Turn I accept custom requests on if riders may ask for something tailored.
- Set the Minimum ride length with − and + (5 to 120 minutes, 15 to start).
- Leave Auto-accept bookings on, or turn it off to accept each booking yourself.
- Set a Break between bookings (0 to 60 minutes, 5 to start).
- Tap Save at the bottom.
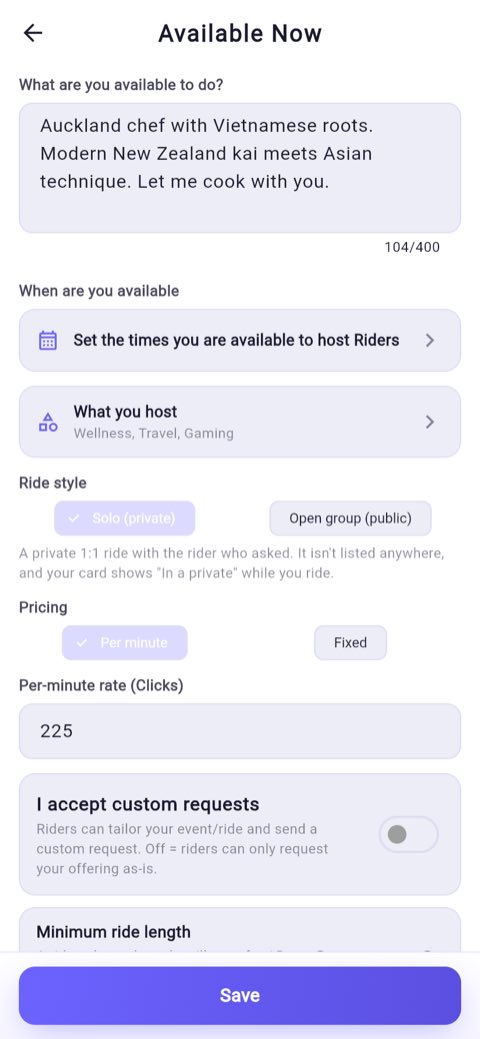
Leo coaches chess. He writes "Chess coaching for beginners", picks Solo (private) and Per minute at ℂ8, and keeps the 15-minute minimum. A rider who leaves after 5 minutes still pays for 15 minutes: ℂ120. Leo keeps 81% of that.
You see "Availability saved.". This page has no on/off switch: saving keeps you on or off as you were. To go on, see Rides, requests and bookings.
- Prices are whole Clicks. The lowest rate is ℂ3 a minute. A fixed fee must work out at ℂ3 a minute or more over its length.
- Your rate is the lowest offer riders can send you. Offers below it, or shorter than your minimum, are greyed out for riders.
- A rider who ends early pays for your minimum. If you end early, they pay only for the time used.
Availability Schedule
These are your regular weekly hours. Riders can book your services only inside them. While JoyR1der is open, they also put you under Available Now by themselves.
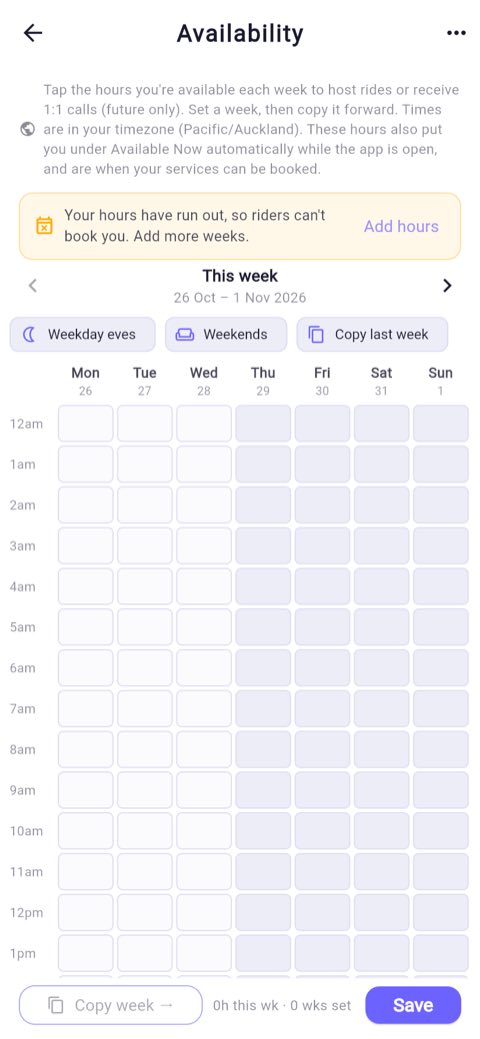
- Open You → Host → Availability Schedule.
- Tap an hour to mark it. Tap a day name to fill or clear the whole day.
- To fill fast, tap Weekday eves (Monday to Friday, 6pm to 10pm), Weekends (Saturday and Sunday, midday to 10pm) or Copy last week.
- Tap Copy week →, choose how many weeks, and tap Copy. This overwrites those weeks.
- Tap Save.
Sam is free most weeknights. He taps Weekday eves, then Copy week →, picks 8 weeks and taps Copy, then Save. On Tuesday at 6pm, with JoyR1der open, he shows under Available Now by himself. At 10pm he drops off again.
Your hours turn on Available Now only when all of these are true: JoyR1der is open on your phone, your listing has a price of at least ℂ3 a minute, you have done the free selfie, and your phone is in the same time zone as your hours. A banner tells you if one is missing. The ⋮ menu has Clear this week and Clear all scheduled times. Hours can be set up to 26 weeks ahead.
Accepting Bonus Clicks
Riders can get Bonus Clicks as rewards. You choose whether riders may pay you partly with them. Every Accepts bonus switch is off until you turn it on.
- Open You → Host.
- Turn on Accept Bonus for rides, calls and tips. It saves straight away.
Mia turns it on. A rider pays for her ride with 40 Bonus Clicks and ℂ60. Mia gets 81% of each part. The Bonus part reaches her as Bonus Clicks.
- This switch covers your Available Now rides and ride requests, paid calls, and pay-to-keep photos and videos. The same switch is also on the Available Now page.
- Events, festivals, services, content and memberships each have their own Accepts bonus switch. Tips in an event follow that event's switch.
- Bonus Clicks you are paid can't be cashed out. They expire 90 days after you get them.
- Riders keep the payment terms they bought or booked under, even if you change the switch later.
Your services
A service is a named, priced session that riders book ahead, for example a 30-minute guitar lesson.
- Open You → Host → Your services, then tap Add service.
- Pick 1:1 session or Group class. You can't change this later.
- Type a Service name. Add a description and a cover image if you like.
- Choose Fixed session fee (a Price (ℂ) and a Length (min)) or Per-minute (a Rate (ℂ/min)).
- If you like, set a lower Member price (ℂ, optional) for your members.
- Under How is it booked?, pick Solo, Private group or Open group. For a private group, set Max seats per booking.
- Turn on Members only or Accepts bonus if you want them.
- Tap Add service.
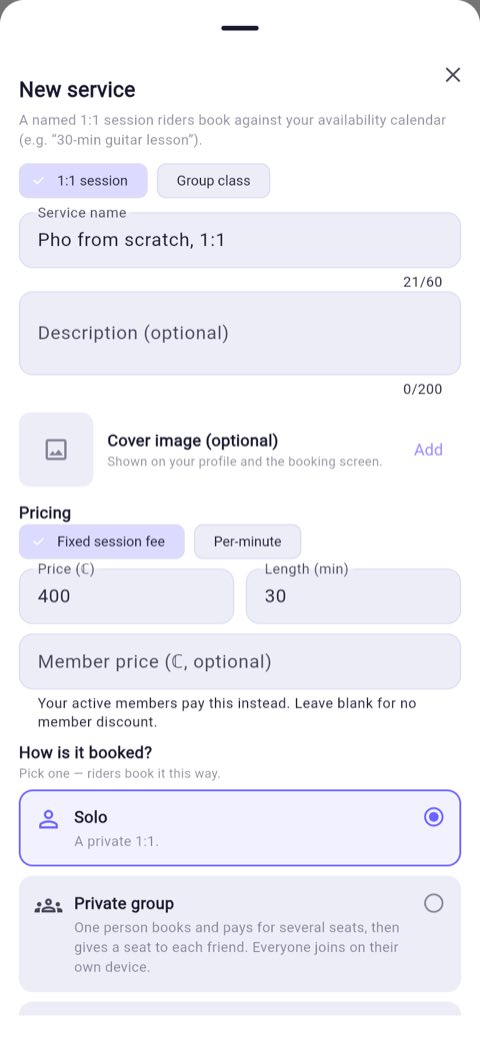
Maya adds "30-min guitar lesson": Fixed session fee, ℂ300 for 30 minutes, Solo. Riders see it on her profile's Services tab with a Book button. Each booking pays her ℂ243.
You see "Service added to your menu.". Riders can book only inside your Availability Schedule. Until you set hours, riders see Not bookable yet.
- A service must work out at ℂ3 a minute or more. Prices are whole Clicks.
- A member price must be lower than the standard price.
- A private group booking has 2 to 50 seats. One person pays for every seat.
- To change a service, tap it, change it, and tap Save. The row switch turns a service off. The bin removes it; bookings you already accepted aren't affected.
- Services are personal. A Team or Organisation can't offer one.
A group class
- In Your services, tap Add service and pick Group class.
- Fill in the Class name, Price per seat (ℂ), Seats and Length (min).
- Under Schedule, pick One-off and a date, or Weekly with a day and time. For weekly, set Ends: after a number of classes (1 to 104) or on a date.
- For a weekly class, you can set Pass for all classes (ℂ, optional): one price for every class.
- You can add a Session pack (optional): a number of sessions (at least 2) and a Pack price (ℂ).
- Tap Add class.
Mia adds "Tuesday Yoga": weekly, 45 minutes, ℂ150 a seat, ending after 8 classes. She adds a pass for ℂ1,100. The pass must be at least ℂ1,080 (ℂ3 × 45 minutes × 8 classes), so it is accepted.
You see "Class added — riders can book seats now.". You are paid 81% of each class after it has run and its 24-hour refund window has closed. Until then the money shows as In escrow in your Wallet.
- A seat must cost at least ℂ3 × the length in minutes.
- A class counts as run only if you were live at least 5 minutes, and still live 5 minutes after the start.
- If you cancel, skip or don't run a class, riders get that class back: their Clicks, their pack session, or that class's share of their pass.
- To skip one week, open the class's event page and tap Skip a date (I'm away).
- After a class is created you can change its end, pass, pack and Members only. To change the price, seats or schedule, remove the class and add it again.
Membership Plans
- Open You → Host → Membership Plans.
- Turn on Offer memberships.
- Type a Plan name and a Price per month (Clicks) (ℂ250 or more).
- If you like, turn on Add a Deluxe tier and give it a name and price. It must cost at least as much as Tier 1.
- Tap Save.
Kai sets "Member" at ℂ300 a month and Deluxe at ℂ800. Each Deluxe member pays ℂ800 a month, and Kai gets ℂ648 of it.
You see "Membership plans saved.". You keep 81% of each payment. After the first save, an Accepts bonus switch appears. Members only events, services and content are set on each one. To stop, turn Offer memberships off, tap Save, then Turn off. Nobody is charged again, and each member keeps access to the end of the month they paid for.
Every row in You → Host
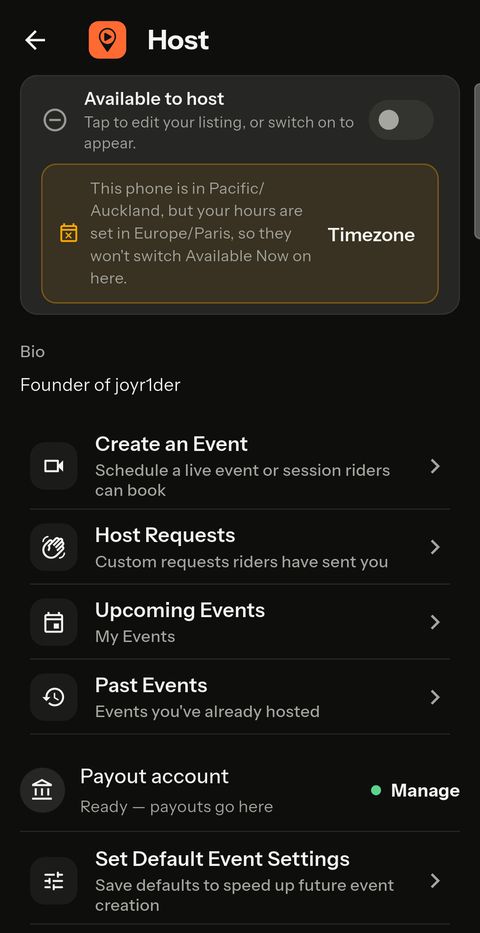
In order, top to bottom:
- Available to host: a card with a switch. The switch turns Available Now on or off. Tapping the card opens your Available Now setup.
- Bio: shown when you have one.
- Create an Event: opens Create Event.
- Host Requests: opens Ride Requests, which holds every ride request, booking and suggestion, not only custom requests.
- Upcoming Events and Past Events.
- Promotion requests: shown only while someone has asked to promote you.
- Pending Approval: shown only while a promoter's event waits for you.
- Payout account: where your payouts go.
- Set Default Event Settings.
- Max quality on Wi-Fi (phones only): goes live in 1080p instead of 720p when this phone is on Wi-Fi. It uses more battery and upload. It is saved on this phone only.
- Availability Schedule.
- Accept Bonus for rides, calls and tips: a switch.
- Promote me: see Promoting yourself.
- Your services.
- Content Studio: see Selling content.
- Refund Requests: see Your earnings and payouts.
- Free Ride Tokens and My Free riders: see Rides, requests and bookings.
- Notify Followers and Promotions (Boost): see Promoting yourself.
- Languages I speak.
- Membership Plans.
- Linked Promoter: see Promoters.
Hosting live eventsGo live now, or schedule an event. Then edit, cancel, run and end it.
Go live now
- On Discover's Live chip, tap the round Go Live Now button in the corner, or tap … and then Go Live Now. The Go Live page opens. (Or tap Go Live on the You page.)
- Check the preview card: title, cover and price. A note says whether it uses your saved live settings.
- If you are in a Team or Organisation, you can tap Host as and pick one (see Teams and Organisations).
- Tap Go Live Now. The camera screen opens.
- Tap Start Now.
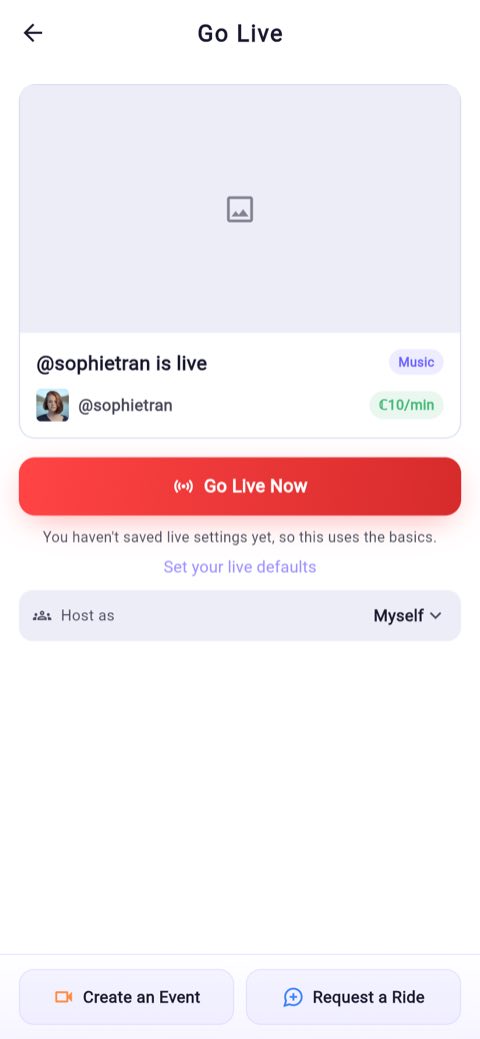
Sam wants to share a sunset guitar jam. He taps the round Go Live Now button in the corner, sees "Sunset guitar jam, ℂ8/min", taps Go Live Now, then Start Now. He is live straight away.
The event is created only when you tap Start Now. There is no countdown.
The camera screen before you go live
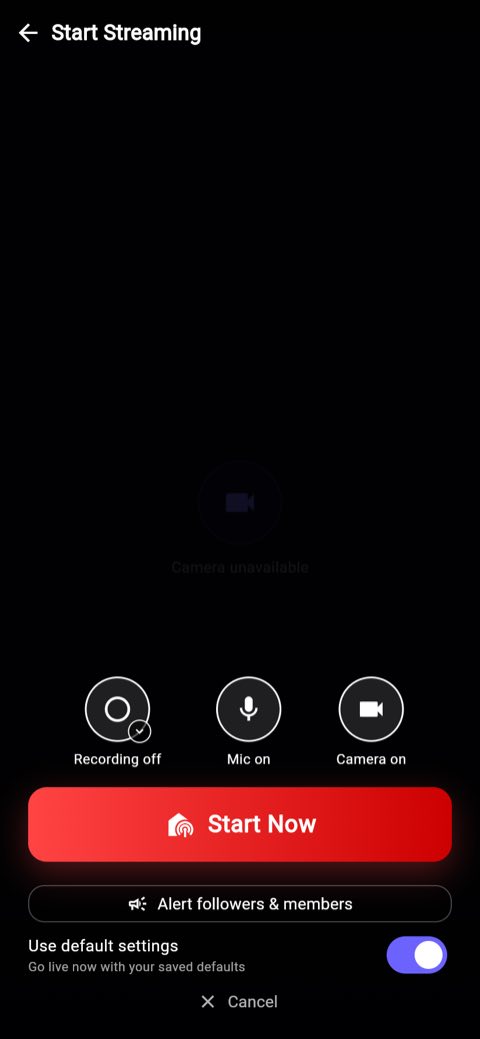
The screen is headed Start Streaming. It has:
- Flip: switch cameras (only if you have more than one).
- The record button. It reads Recording off. See Recording.
- Mic on / Mic off and Camera on / Camera off.
- Alert followers & members: for public events and Go Live Now. After you tap it, it reads Followers alerted.
- Use default settings: Go Live Now only. On, you go live with your saved defaults. Off, Start Now first opens Create Event so you can set the event up.
- Start Now and Cancel.
For a scheduled event, you also see how many riders are waiting in the lobby.
Mia's stand-up night starts at 8pm and six riders are waiting. She taps the record button once (it now reads HD - On), checks her mic, and taps Start Now.
"Couldn't connect your stream" often means a VPN is blocking live video. Turn the VPN off and try again. If the camera won't start, check camera and microphone permissions for JoyR1der in your phone's settings.
Schedule an event (Create Event)
Open Create Event in any of these ways: … on Discover → Create an Event; Create an Event on the Go Live page; or You → Host → Create an Event. There are eight steps.
- Basics: type the Event Title and Description. You can add a Venue address (optional) and Tags (optional). Pick a Category (1 to 3). Add Event location (optional) and a Cover Image.
- Schedule: pick Go Live Now or Schedule. For Schedule, pick a date (up to 1 year ahead) and a time.
- Pricing: pick Cumulative (PPM) and type a Rate per rider, per minute (ℂ), or pick Fixed Fee and type a Fixed ticket price (ℂ) and Expected duration (minutes). For a per-minute event you can also set a Private rate per rider, per minute (ℂ).
- Options: set seats, who can join, and the other switches (listed below).
- Content: attach files you can show on screen while live.
- Moderators: Invite moderators (optional). For a scheduled event you can also add up to 2 Co-hosts (optional) and their share.
- Boost: buy extra visibility if you want it (see Promoting yourself).
- Review: check everything and tap Publish Event.
Jo sells a 60-minute pottery demo as a ℂ150 Fixed Fee. Publishing fails: ℂ150 over 60 minutes is ℂ2.50 a minute, under the ℂ3 lowest price. She raises it to ℂ180 and taps Publish Event.
You see "Event created successfully!" and a share sheet. With Go Live Now picked, the camera screen opens instead. Any boosts you picked are charged when you publish.
- Every event charges Clicks. There are two ways: Cumulative (PPM), where each rider pays your rate per minute, and Fixed Fee, a ticket price per rider.
- The lowest price is ℂ3 a minute per rider. For a fixed fee, the ticket divided by the expected duration must be at least ℂ3.
- The private rate starts at twice your rate and can be at most ℂ100 a minute.
- On a fixed fee, riders can ask for a refund for a short event within 24 hours after it ends.
- You can turn on Price stepping so the per-rider price drops as more riders join.
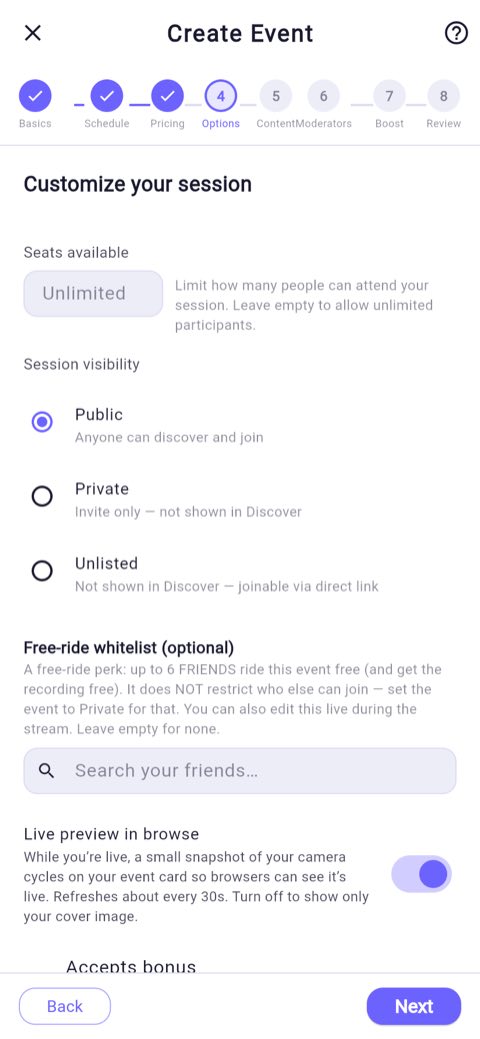
The Options step
- Seats available: leave it empty for no limit. It limits advance bookings. Riders can still join while you're live.
- Session visibility: Public (anyone can find and join), Private (invite only, not shown in Discover) or Unlisted (not shown in Discover, joinable by link).
- Free-ride whitelist (optional): up to 6 friends who ride this event free.
- Live preview in browse: shows a snapshot of your stream on your card, refreshed about every 30 seconds.
- Members only: shown if you offer memberships. Only your members can enter.
- Deluxe members ride free: your Deluxe members ride this event at no charge, and you earn nothing from them.
- Accepts bonus: covers this event and everything bought in it.
- Allow advertiser sponsorship (public events): on to start (see Promoting yourself).
Use my default event settings
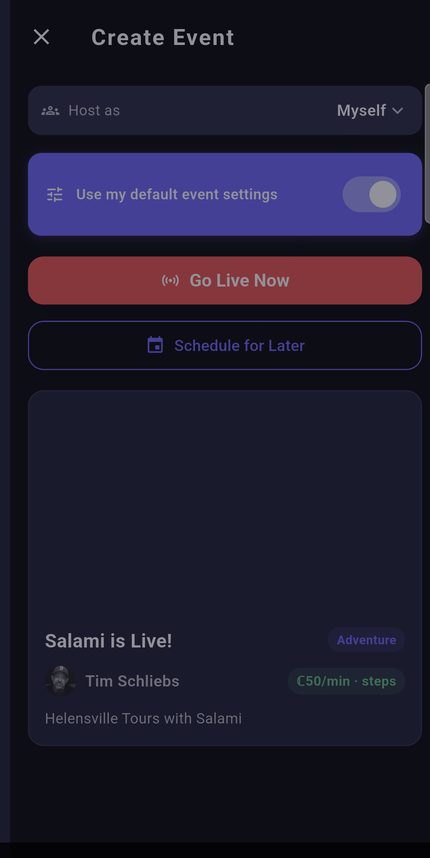
Once you have saved default event settings, Create Event opens with Use my default event settings switched on, and a preview of your event.
- Tap Go Live Now to go live with your defaults.
- Or tap Schedule for Later, pick a date (up to 90 days ahead) and a time (at least 5 minutes from now). The event is published at once.
- To change anything first, switch Use my default event settings off. The eight steps open, filled in with your defaults.
Kofi's defaults are his Friday jazz night. He opens Create Event, taps Schedule for Later, picks next Friday at 8pm, and his event is listed.
Repeat an event
- In Create Event, switch Use my default event settings off if it is on.
- On the Schedule step, pick Schedule and the first date and time.
- Turn on Repeat this event.
- Pick a Frequency: Daily, Weekly or Monthly.
- Set Every with − and +.
- Set Until, the last date.
- Read the line that says how many events it creates, then finish the steps and tap Publish Event.
Ravi teaches a 7am yoga class. He picks Weekly, Every 1, and an Until date two months away. The preview tells him how many events it will make, and he taps Publish Event.
You see "Created N events in the series.". Riders book and pay for each event on its own.
Every can be up to 30 days, 4 weeks or 24 months. Until can be up to 2 years ahead. A series has at most 60 events. You can't add a repeat when you edit an event, or with Schedule for Later. A pass for a whole run of classes is set on a weekly group class, not here.
Edit an event
- Find the event in You → Host → Upcoming Events.
- On the event's card, open the … menu and tap Edit event. The Edit Event screen opens. It shows who has booked.
- Change what you need.
- Tap Update Event.
- If the event is part of a series, pick This event, This and following events or All events.
Ellie's book club moves from 6pm to 7pm this week only. She taps Edit event, changes the time, taps Update Event and picks This event. The rest of the series stays at 6pm.
You see "Event updated successfully!". You can't change Host as when editing.
Cancel an event
- Open the event with Edit event.
- Tap Cancel Event.
- Read the message and tap Cancel Event again (or Keep Event). For a series, pick which events to cancel.
Tom is ill and can't run his Saturday workshop. Twelve riders reserved spots. He cancels it. All twelve get their deposits back automatically and each gets a notice. The ℂ200 he spent on a boost is not refunded.
You see "Event cancelled.". Riders are told "'title' has been cancelled by the host. Any held credits have been refunded." Your promoter is told too. Deposits, tickets, class and pass shares, free-ride tokens, gift seats and sponsorships are refunded automatically. Boosts are not refunded. You can't cancel an event that is live or has ended; end a live event instead.
If you don't go live on time
- 10 minutes after the start, you get "Go live now — or your event is cancelled". Riders are told too.
- 20 minutes after the start, the event is cancelled and riders get everything back.
- Going live before then stops the cancel.
- A Go Live Now event that you created but never started ends after 30 minutes.
Nina's 3pm quiz is booked, but she is stuck in traffic. At 3:10 her phone tells her to go live in the next 10 minutes. She can't, so at 3:20 the quiz is cancelled and every rider is refunded.
While you're live
Your tools are on the side of the live screen. Tap … at the bottom of them for Host controls, in groups: Broadcast (camera, mic, screen share, recording, pause), Room, Engage, People and Safety (Help and Report). Press and hold a tool to pin it. The top bar shows LIVE and the time, Earned so far this stream, your average per minute and how many are riding. The Riders card shows who is in, with See all and Find a rider. The bottom bar has Reply to chat, your mic, and Pause.
- Riders: the list of who is in. Tap a rider for Enable camera & mic, Mute mic, Blind camera, Allow screen share, Pin to grid, Offer co-host role, Make moderator, Give a free ride (or End free ride), Time out chat, Eject and Report. Riders can't ask to speak, so you enable them.
- Request a moderator: the shield icon at the top of the Riders list asks JoyR1der to send a moderator. You can have up to 6 moderators (10 once 1,000 riders have joined). See Community Moderation.
- Pause / Resume: riders aren't charged while you're paused, and paused time doesn't count toward the 75% of its length a booked event must run for no-shows' tickets to go to you.
- In Host controls: Adjust pricing, Edit my whitelist, Q&A, Deluxe chat and Set up Private bidding under Room; Poll, Set up a tip goal, Pin event content, Display Top Tippers, Paste a message and Paste an image under Engage.
Ben's DJ set has 40 riders at ℂ10 a minute. He opens Host controls → Adjust pricing and drops to ℂ8. Everyone pays ℂ8 from then on. When he takes a 5-minute break, he taps Pause, so nobody is charged.
- Only per-minute events can change price while live. A lower price applies at once. A higher price asks each rider to accept it or leave.
- Bid for Private needs a private rate. You set a floor, a length (up to 60 minutes) and seats (up to 8). The top bidders win, then pay your private rate each minute.
- An ejected rider can't rejoin that stream.
End your stream
- Tap the red door button at the bottom of the action icons.
- Read "End Session?": all riders are disconnected and charged for their time.
- Tap End Session (or Keep Going).
Lu streams a 45-minute cooking class with 20 riders at ℂ10 a minute, then taps End Session. The Session Complete! screen shows her net earnings, riders and duration. She recorded, so she taps See My Content.
The Session Complete! screen shows Net earnings, Riders and Duration. You keep 81% of what riders paid, less any promoter share. Your earnings then follow the holds in Your earnings and payouts.
Rides, requests and bookingsGo Available Now, answer ride requests, take bookings and get paid.
Turn Available Now on or off
- Tap the Available Now button (the JoyR1der map-and-play mark) at the top of Discover, or … → Update my Available Now status. The Available Now panel opens.
- Turn on the switch (Turn on to receive ride requests).
- Under Keep me available until, pick Until I turn it off, For 30 min, For 1 hr or For 8 hr.
- To stop, turn the switch off here, or on the Available to host card in You → Host.
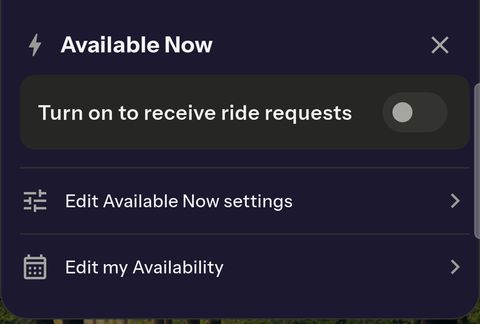
Mia finishes work and taps the Available Now button. She turns the switch on and taps For 1 hr. Riders can find her straight away. After an hour she is switched off, even if she closed the app.
Riders see you on Discover's Available chip, with a Ride Now button. The panel also has Edit Available Now settings and Edit my Availability.
- You need the free selfie check and a priced listing. If your listing has no price, the setup page opens first.
- With Until I turn it off, you stay on while JoyR1der is open. If you close it, you stay listed for up to 2 hours, then you are switched off.
- Going live pauses Available Now. It comes back on by itself when the session ends.
- If a ride request rings you and you don't answer, you get Still available to host? after 45 seconds. If you still don't open the app, Available Now is switched off.
Answer a ride request
- Your phone rings, or you get a New ride request notice. Tapping Accept on the ring opens the request; it doesn't accept the ride yet.
- Read Rider offers: the price, length and any times. If the rider offered several times, tap one.
- Tap Accept, Suggest a change or Decline.
- For a ride now, the camera screen opens. Go live to start the ride.
Alex offers ℂ10 a minute for 20 minutes. Sam taps Accept. A deposit of ℂ20 (a tenth of ℂ200) is held from Alex, and Sam goes live for the ride.
Nothing is charged until you accept. All your requests and bookings are in You → Host → Host Requests (the screen is called Ride Requests). Rows that need you say Your turn.
- You have 3 minutes to answer a Ride Now request. The rider can tap Keep waiting to add time, up to 15 minutes from sending.
- If you are live, a banner shows the request. Accepting it ends your stream and moves you to the ride.
- You need the free selfie check to accept a ride.
Suggest a change
- On the request, tap Suggest a change.
- Set Your rate (or Your flat fee), the Duration and the Start: Now, +5 min, +15 min, +30 min, +60 min or Pick time.
- Add a Message if you like (up to 500 characters).
- Tap Send suggestion.
Alex asks for a ride now at ℂ8 a minute. Sam suggests ℂ10 a minute, starting in 15 minutes. Alex accepts, and the ride is booked.
You see "Reply sent — waiting for name to respond.". The rider can accept, decline or suggest back. For a service, you can change only the time and the message. If nobody answers in time, the request closes. A request can go back and forth at most 30 times.
Decline a request
- Tap Decline.
- Pick No reason given, Can't host right now (with Available again in ~n min), or Custom reason.
- Tap Decline request.
Sam is busy, so he picks Can't host right now and 10 minutes. He is off Available Now for 10 minutes, and Alex sees that Sam will be free soon.
No money moves. The rider sees your reason, or "Your host can't take this ride."
Bookings for later
- A rider books one of your services, or a ride for later. With Auto-accept bookings on, you get New booking confirmed. With it off, you get New booking request and accept it in Host Requests.
- 2 minutes before the start you get Ride in 2 minutes. At the start your phone rings: It's time to ride.
- Tap Start ride and go live.
Ana books Maya's ℂ300 lesson for Friday at 7pm. Auto-accept is on, so it is confirmed, and ℂ30 is held from Ana at once. At 7pm Maya's phone rings.
- The rider's deposit is a tenth of the price. For a per-minute ride it is a tenth of your rate × the longer of the booked length and your minimum. It isn't part of the bill: the rider gets it back when the ride ends, less any part of a minimum their balance couldn't cover.
- An auto-confirmed booking holds the deposit at once. A booking you accept by hand holds it about an hour before the start (at once if the start is within the hour).
- A booking you don't answer closes 15 minutes before its start.
- If the rider doesn't show: once you've been live 5 minutes and it is 5 minutes past the start, the deposit is paid to you.
- If you don't start within 15 minutes of the start, the request is cancelled and the rider refunded.
- If the rider cancels within 30 minutes of the start, after you went live, the deposit goes to you.
- To cancel an accepted booking, tap Cancel and confirm. The rider is refunded in full.
Solo, Private group and Open group
- Solo: a private 1:1 ride with the rider who asked. It isn't listed anywhere.
- Private group (services only): one person books and pays for every seat, then hands the seats out. The session is unlisted, and only seat holders can join.
- Open group: your ride goes live publicly. Anyone can join at your price, and everyone pays the standard price.
Jo books 4 seats on Maya's ℂ300 private group lesson. When Maya accepts, ℂ1,200 is taken from Jo. Three people join. Maya ran the session properly, so the fourth seat is paid to her at the end too.
Each seat is paid to you (81%) when its holder joins. Unused seats are paid to you at the end only if you were live at least 5 minutes and still live 5 minutes after the start. Otherwise they go back to the booker. Your earnings are held 24 hours, while the booker can ask for a refund.
Free riders and free-ride tokens
My Free riders (You → Host) is a list of up to 6 friends who ride your streams free.
- Open You → Host → My Free riders.
- Type in Search your friends… and tap a friend to add them.
A free-ride token gives one rider a free seat on one event.
- Open your event. On the Free-ride tokens card, tap Buy and pick 1, 3, 5 or 10 tokens.
- Type the rider's @username and tap Assign.
- Track your tokens in You → Host → Free Ride Tokens.
Priya's show is a ℂ200 ticket. She buys 1 token for ℂ38 (19% of ℂ200) and assigns it to @jo. Jo joins free, and Priya earns nothing from that seat.
You pay only JoyR1der's 19%: 19% of a fixed fee, or 19% of your per-minute rate for a block of minutes (30 to start). You earn nothing from free riders or token holders. You can take a token back before the event starts.
Give a free ride while you're live
You can also make one rider's ride free during the stream. Tap the rider and tap Give a free ride. The dialog shows what it costs before you confirm. Each rider can have one free ride at a time.
- Per-minute events: you pay JoyR1der's 19% of their rate each minute (ℂ19/min on a ℂ100/min ride) for as long as it lasts. Tap the rider and tap End free ride to stop it; they then choose to pay or leave. If your Clicks run out, it ends the same way, and you get a warning about 5 minutes before.
- Fixed-price events: you pay 19% of the ticket for the rest of the event, held when you give it, and the rider gets that part of their ticket back. It can't be ended. If the event ends early or the rider leaves, you get some of the hold back; if it runs late, the extra minutes are charged. You can't give one once the event is past its planned length.
If any event runs past its planned length while you have free rides going, a notice tells you that you keep paying per minute for each free ride you've given that's still running, until you end the session.
The rider's end screen shows how many minutes were free and any ticket refund.
Recording your live eventsRecord a stream, then sell or share the recording.
Record a stream
- On the camera screen before you go live, find the record button. It reads Recording off.
- Tap it once to record your camera in HD. It now reads HD - On.
- Or press and hold it to open Record this stream, and pick Record just your camera or Record all. Record all reads All - On.
- Tap Start Now. Recording starts a few seconds after you go live.
Omar hosts a two-hour music quiz with two guests on camera. He presses and holds the record button and picks Record all, so both guests are on the recording.
Everyone in your stream is told when recording starts. While you are live, the Record tool asks which kind you want. To stop, tap it again and confirm Stop recording. The recording is saved to your content.
What recording costs
- Your first 90 minutes of recording are free.
- After that, recording costs ℂ3 a minute from your Clicks. At 90 minutes the app asks "Keep recording?". Tap Keep recording (ℂ3/min) or Stop recording.
- If you don't answer within a minute, or your Clicks run out, the recording stops. Your stream keeps going.
- When you pick Record just your camera (or tap once for HD), the recording is made on your phone and uploaded after the stream, even if guests are on camera. It records only your camera and isn't charged. If it can't start, a normal recording is made instead.
Grace records a 2-hour panel with Record all. At 90 minutes the app asks whether to keep recording at ℂ3 a minute. She taps Keep recording. The last 30 minutes cost her ℂ90.
- A recording stops after 3 hours. You get a warning a minute before. Your live stream keeps going.
- While a recording is running (other than one made on your phone), the whole stream ends 6 hours after it started. This applies in the free 90 minutes too.
Where recordings go
- After the stream, tap See My Content on the Session Complete! screen, or open You → Host → Content Studio.
- Find the recording. It is a draft, named after your event.
- Open it, set the price and the switches, and tap Publish. See Selling content.
After his quiz, Omar opens Content Studio and finds the draft. He turns off Members only and Free to view, sets ℂ200 and taps Publish. Each sale pays him ℂ162.
A new recording starts as Members only, free to view, with downloads off, and nobody can see it until you publish. A camera-only recording made on your phone can take a while to upload; you are told in the app when it's ready.
Selling contentUpload videos, images, PDFs and audio in Content Studio and sell them.
Upload and sell a file
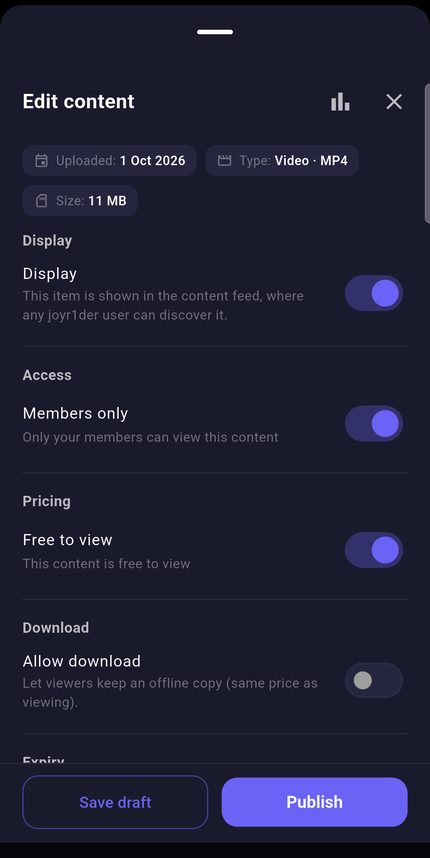
- Open You → Host → Content Studio.
- Tap Upload and pick a file.
- The editor opens (Uploaded — set it up). Add a cover image, a Title and a Description (optional). Pick up to 3 categories.
- Turn on Display to show the item in the content feed.
- Leave Members only on for your members only, or turn it off for everyone.
- Leave Free to view on, or turn it off and type a Price (Clicks).
- If you like, turn on Allow download and pick Auto-hide after.
- Tap Publish (or Save draft).
Priya films a 20-minute beginner yoga flow and uploads it. She titles it "Morning Flow", turns on Display, turns off Members only and Free to view, and sets ℂ300. Each time someone buys it, she gets ℂ243.
You see "Published.". Buyers pay once and keep access. One price covers viewing and downloading. You get 81% of each sale. Your share first sits in the 24-hour refund window, then in the 90-day hold, before you can cash it out.
- File types: video (mp4, m4v, mov, webm), image (jpg, png, webp), PDF, and audio (mp3, m4a, aac, ogg, wav).
- Largest file the server takes: video 1 GB, audio 256 MB, PDF 64 MB, image 16 MB. The app's file picker stops at 512 MB.
- You get 5 GB of storage free.
- The highest price is ℂ100,000.
- Uploading and publishing need the free selfie check. Selling isn't available in every country.
What the switches do
After you publish
- In Content Studio, tap an item to open Edit content. Change it and tap Publish or Save draft.
- Tap the stats icon for Content stats: streams, downloads, purchases, earnings and more.
- To stop selling an item, set Auto-hide after. There is no delete button.
Priya's yoga video sold 12 copies this month. To stop selling it next week, she sets Auto-hide after to 7 days. People who already bought it can still watch it for 30 days from when they bought it.
To sell a PDF of guitar chords, or any download, upload it here and turn on Allow download. There is no separate shop. A video can also be trimmed into a clip of up to 60 seconds with Make a clip from this video.
Pay-to-keep in a 1:1 chat
- In a 1:1 chat, tap the photo button and pick Pay-to-keep photo or video.
- Pick the photo or video.
- Type a Price in Clicks and tap Send.
A fan asks Priya for a photo of her signed yoga certificate. She sends it as pay-to-keep for ℂ50. The fan sees a blurred tile, pays, and Priya gets ℂ40.
The other person sees a blurred preview and can pay to unlock and keep it, or decline. Pay-to-keep needs the full ID check, not only the selfie, and works only in 1:1 chats.
Your earnings and payoutsSee what you've earned, set up payouts, and cash out.
See your earnings
- Tap your ℂ balance to open your Wallet.
- Scroll to the holds tiles and EARNINGS.
- Under Earnings over time, pick a period (Last 24h, Last 7 days, Last month, All time) and a source (All sources, Host, Promoter, and Team or Org if you're in one).
- Scroll on for By income source, Top events and Payout history.
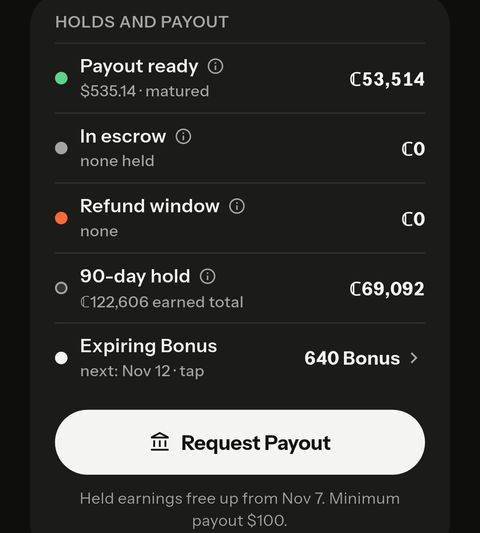
Leo earns ℂ5,000 from a Saturday class. On Sunday it shows under Refund window. A day later it moves to the 90-day hold. About three months after that, it shows as Payout ready.
Only Clicks you earn can be cashed out. Clicks you buy and Bonus Clicks can't. More about Clicks and dollars is in Money and Clicks.
Set up your payout account
- Open You → Host → Payout account (or Wallet → MANAGE → Payout account) and tap Set up.
- Tap Set up payouts. The page of our payout partner, Trolley, opens.
- Add your bank details and tax form there, and complete its checks.
- Come back to JoyR1der.
Sam has earned his first ℂ12,000. He taps Set up, then Set up payouts, adds his bank and tax form on the Trolley page, and comes back. The row says Waiting for approval until Trolley approves him.
The row shows Not set up, Waiting for approval, Ready — payouts go here or Problem — needs your attention. Payouts are sent in US dollars to your bank.
The ID check before your first payout
- In your Wallet, read "ID needed before your first payout. It's free and only takes a few minutes."
- Tap Verify ID, then Verify my ID with Stripe.
- Follow Stripe's steps with your photo ID and a selfie.
Ana is ready for her first payout. She taps Verify ID, scans her passport and takes a selfie with Stripe. A few minutes later she can request the payout. Nothing was charged.
You see "Your ID is verified". The ID check for a payout is free. If you owe an ID-check fee from another check for more than 90 days, payouts pause until you pay it.
Cash out
- In your Wallet, tap Request Payout.
- Type an Amount to withdraw, or tap Withdraw max. You can take part of your balance.
- Confirm.
Ana has $340 ready. She taps Request Payout, types 300 and confirms. $300 leaves her balance and $40 stays. When Trolley pays it, she gets "Payout completed".
You see "Payout sent": the money is on its way to your payout account and has been taken from your balance. One payout covers your host and promoter earnings together.
- The minimum payout is $100 (ℂ10,000). ℂ100 is $1.
- Earnings can be cashed out 90 days after you earn them.
- You need a Ready payout account and the ID check.
- Cash-out pauses while you owe Clicks from a refund, and while your account is under review.
- If a payout is returned, the money comes back to your balance and a red banner at the top of your Wallet tells you what to fix.
Refund requests on your sales
- Open You → Host → Refund Requests.
- Read each request: the amount, the reason and the deadline.
- To dispute one, tap Challenge.
- Fill in Your side of the story (staff will review) and tap Submit challenge.
A rider who bought Priya's ℂ150 workout video asks for a refund. It is under ℂ200, so it would be approved automatically if she did nothing. She taps Challenge and explains the video matches its description. Staff make the final call.
Riders can ask within 24 hours. The amount is held from your earnings at once. You have 3 days to respond. A request of ℂ200 or less that you don't challenge is approved automatically. Bigger ones go to staff.
Promoting yourselfBoost an event, put yourself first in People, tell your followers, and let advertisers sponsor seats.
Boost an event
- Go to the Boost step in Create Event. For an event you already made, open it with Edit event and go to Boost.
- Pick any of: Double-height card (ℂ200 a day), Image carousel (ℂ100 a day), Live Spotlight (8 seconds at ℂ150 a day, or 10 seconds at ℂ250 a day).
- Pick how long it runs.
- Tap Publish Event (new event) or Save boost (existing event).
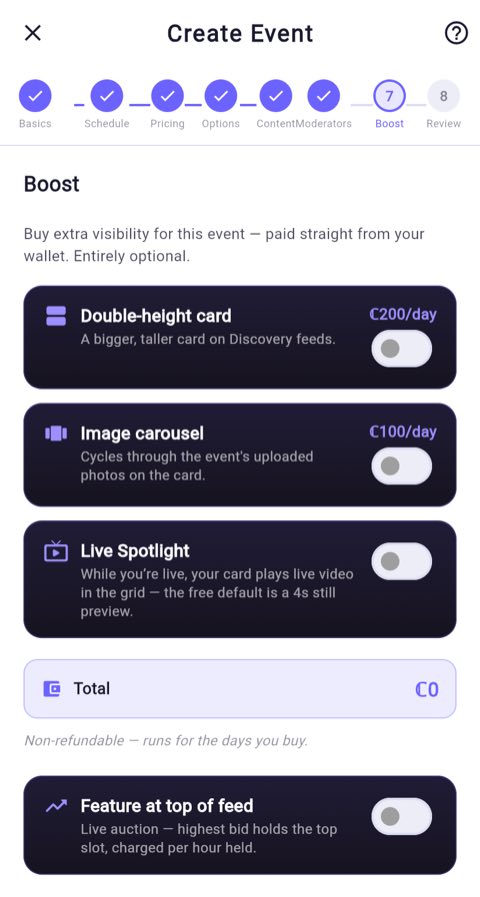
Leo's Friday guitar jam is in 3 days. He opens it with Edit event, picks Image carousel for 3 days (ℂ300) and taps Save boost. His card shows a photo carousel until the event.
You see "Boost purchased — non-refundable.". Bonus Clicks are used first.
On the same step, Feature at top of feed lets you bid for the top slot in All events, Live now or Upcoming. Set a bid per hour (at least ℂ20, ℂ50 to start) and a daily cap of 1 to 24 hours of bidding (8 to start). You pay for each hour you hold the slot. Boosts can't be refunded, even if you cancel the event.
Promote me
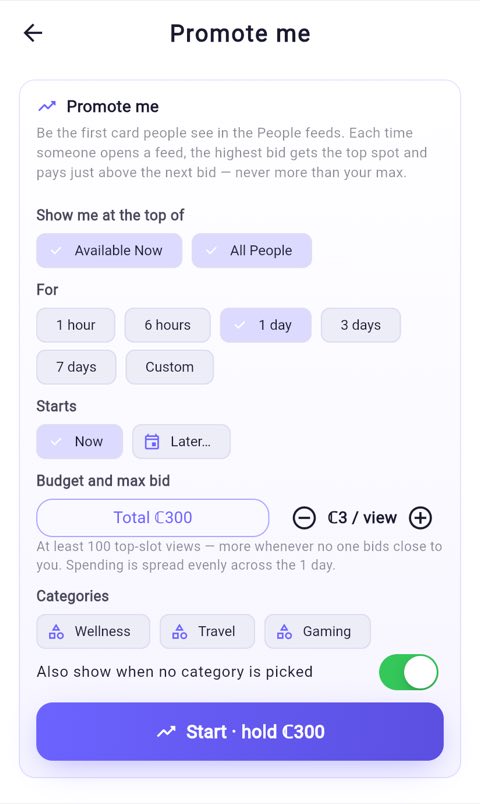
- Open You → Host → Promote me.
- Under Show me at the top of, pick Available Now, All People or both.
- Pick how long: 1 hour, 6 hours, 1 day, 3 days, 7 days or Custom.
- Pick when it starts: Now or Later… (up to 14 days ahead).
- Set your total budget and your highest bid per view.
- Pick the categories you host where you want to show.
- Tap Start · hold ℂN, then Start campaign.
Mia runs Spanish conversation sessions. She picks Available Now, 6 hours, a ℂ300 budget and ℂ3 a view, then starts. Only ℂ120 is spent, so ℂ180 comes back to her at the end.
Your whole budget is held. When someone opens the feed, the highest bid wins the top card. What isn't spent comes back when it ends, or when you tap Stop and refund ℂN.
Bonus Clicks can't pay for Promote me. You can run one campaign at a time. The budget must be at least ℂ20 and at least your highest bid.
Notify your followers
- Open You → Host → Notify Followers.
- Type a Title (up to 100 characters) and a Message (up to 500).
- If you like, pick an event under Link an event (optional). Only your public upcoming or live events are listed.
- Tap Send promotion.
Leo writes "Friday jam night!" and "Bring requests — starts 8pm", links his event and taps Send promotion. His followers and members get a notice.
It's free. It goes to your followers and active members, up to 2,000 people. You can send 5 an hour.
Promotions (Boost)
You → Host → Promotions (Boost) opens My Promotions. It lists older promotions and their results. You can't start a new one here. To boost an event, use its Boost step. To stop an old promotion, tap Stop & refund, then Stop boost. What's left of its budget comes back to you.
Advertiser sponsorship
- In Create Event, go to the Options step.
- Leave Allow advertiser sponsorship on, or turn it off to opt this event out.
- Publish or save the event.
Maya's Saturday guitar workshop is public, with sponsorship on. A music shop pre-buys 5 seats. Five adults join free, and Maya is paid her normal rate for their minutes.
Sponsorship costs you nothing. Advertisers pre-buy free seats on your scheduled public event, and you still earn your normal rate (81%). The switch shows only for public events.
Teams and OrganisationsHost together and share the earnings, or run events and pay hosts a commission.
Start a Team or Organisation
- Open You → Teams (or Organisations), under Groups. Or tap … on Discover → Start a Team or Start an Organisation.
- Tap Create a Team (or Create an Organisation).
- Type a Name.
- Type an @username. It must be unique across JoyR1der and can't be changed later.
- Add a Description if you like.
- For an Organisation, you can type a company name in Organisation (optional) and set Default host commission with the slider (0% to 50%, 15% to start).
- Tap Create Team (or Create Organisation).
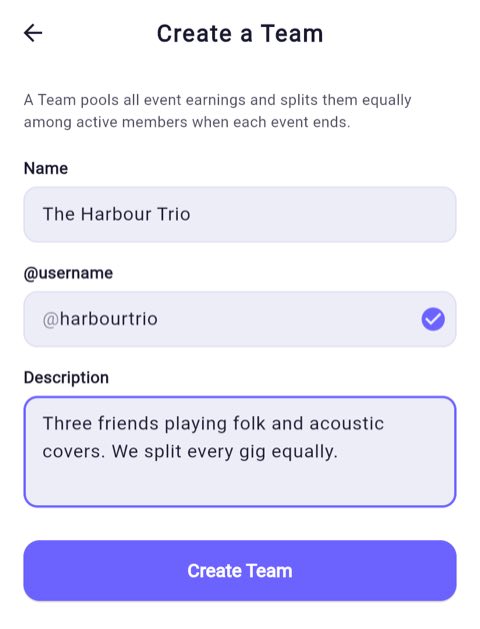
Mia, Leo and Sam play folk songs together. Mia creates a Team called "Willow Lane" with the handle @willowlane. Then she invites Leo and Sam.
Creating a Team or Organisation is free and needs no ID check or selfie. Each host does the free selfie check before going live, and cashing out needs the ID check, as for anyone. You can create up to 5 Teams and Organisations in all. Add a photo later in the group's settings.
Invite members and guest hosts
- Open the group's page and its member list.
- Tap the Invite icon at the top. Invite by @username opens.
- Type their @username.
- For someone who will host for you but isn't a full member, tick Guest host and set their share. (On an Organisation, only the Owner or a manager sets it; anyone else's invite uses the default host commission.)
- Tap Send invite.
Willow Lane wants a fiddler, Kai, for one set. Mia invites @kai as a Guest host at 40%. Kai's set earns ℂ500 after JoyR1der's 19%. Kai gets ℂ200, and the other ℂ300 is shared equally by the three members (ℂ100 each).
You see "Invite sent.". They get a notice and tap Accept or Decline on the group's page. Any member who isn't a guest can invite. Guest hosts can't invite others, and aren't in the Team's equal split.
How the money is split
JoyR1der keeps 19% of each group event's earnings. Then:
- A linked promoter's share comes off first (see Promoters).
- A guest host's agreed share comes off, if a guest hosted.
- Team: the rest is shared equally among the members when the event ends. Any odd Click goes to the host.
- Organisation: the host gets the commission. The rest goes into the Organisation treasury.
Riverside Live is an Organisation with a 20% host commission. An act's event takes ℂ1,000 from riders. After JoyR1der's 19%, ℂ810 is left. The host gets ℂ162 and ℂ648 goes into the treasury.
See your share in your Wallet's earnings with the Team or Org filter.
Move money out of the treasury
- On the Organisation's page, find the Organisation treasury card and tap Request a transfer.
- In Transfer from treasury, check the Available amount.
- Type the amount and a reason. Other managers see the reason.
- Tap Transfer.
Riverside Live's treasury holds ℂ648. The owner transfers ℂ300 with the reason "Venue hire 14 Nov". Her manager, Tom, gets an alert with the amount and reason.
The Clicks join your earnings and can be cashed out after the usual hold. Only the Owner and Organisation managers can transfer. The Owner makes someone a manager from the member list: ⋮ → Make organisation manager.
Host an event as your group
- On the Go Live page or in Create Event, tap Host as. It starts on Myself.
- Pick your Team or Organisation.
- Go live, or finish the steps and tap Publish Event.
Leo wants tonight's busking stream to count for Willow Lane. On the Go Live page he taps Host as, picks Willow Lane, and taps Go Live Now. The earnings are shared by the Team.
Host as shows only if you belong to a Team or Organisation. You can't change it when you edit an event. The group's page also has Create a Team event (or Create an Organisation event), which offers Standalone event or Festival. To set the group's own defaults, use Set default event settings on the group's page: on a Team any member can, on an Organisation only the Owner.
Plan a festival
Festivals are made only through a Team or Organisation.
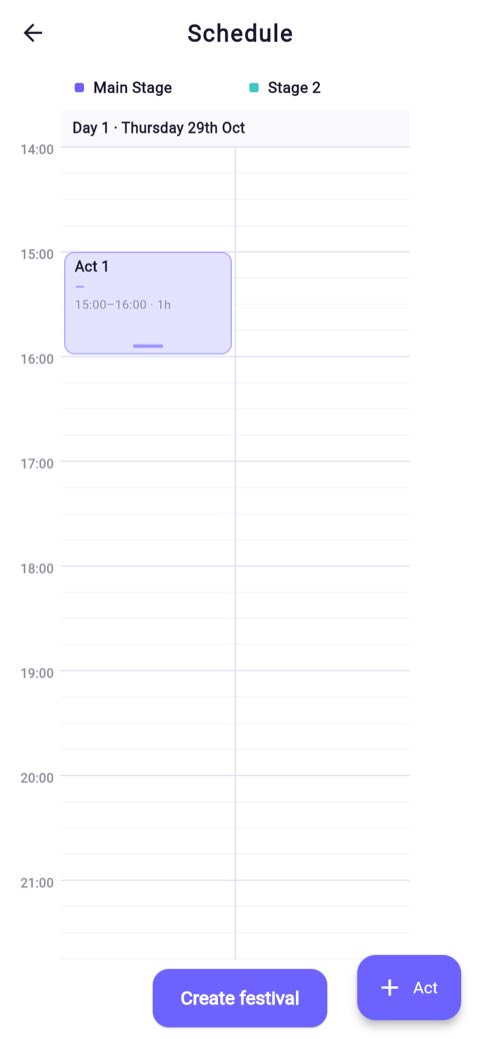
- On the group's page, tap Create a Team event (or Create an Organisation event), then Festival.
- In New festival, type the title. Set the date, the number of days, the daily hours and the number of stages.
- Add a description, cover and the other details.
- If you want, set All-access pass price (Clicks · 0 = no pass).
- Tap Schedule the line-up.
- Tap Act to add an act, and drag it to its time and stage.
- Open each act and fill in its steps: Basics (title and host), Schedule, Pricing, Options, Moderators and Review.
- Tap Create festival.
Willow Lane plans a one-day festival with two stages and five acts at ℂ5 a minute each. They add a ℂ500 all-access pass and tap Create festival. Each act's host gets a notice that they're on the line-up.
After that, changes save by themselves. Each act's earnings follow the group's split.
- A festival can last up to 60 days, with up to 20 stages. Each act can be up to 12 hours.
- Each act's host must be a member or guest host of the group.
- On an Organisation festival, an act can also name a Performer who gets a share (20% to start). Teams don't have this.
- All-access pass: JoyR1der keeps 19%. The 81% is shared across the acts by how many minutes pass holders watched each one, 24 hours after the festival ends. A rider's act tickets are refunded when they buy the pass.
PromotersA promoter helps a host fill events and earns a share of the host's earnings.
The promoter's share comes out of the host's 81%. Riders never pay extra. It counts the host's rides, tickets, tips and memberships on all their events, whoever brought the rider. Content sales don't count. A host, Team or Organisation has one promoter at a time. A promoter can promote many hosts.
Ask a host if you can promote them
- Open the host's profile and go to the About tab.
- Tap Ask to promote their events.
- Add a note if you like (up to 300 characters).
- Tap Send request.
Maya loves a local DJ's Friday sets. She asks to promote him and writes "I run a 2,000-member music group in town". Two days later she gets "You're promoting DJ Rio", and a Promoter row appears on her You page.
You see "Request sent — we'll let you know when the host replies.". Asking is free and needs no ID check. If the host declines, you can't ask them again for 30 days.
Host: answer a request
- Open You → Host. Find Promotion requests.
- Tap the tick to accept, or the cross to decline.
- To accept, set their share on the slider in Accept and set their share, and tap Accept.
DJ Rio sees Maya's request. He taps the tick, sets 15% and taps Accept. He sees "They're now promoting your events, at 15%."
If you already have a promoter, the button reads Replace and accept, and your old promoter is told.
Host: invite a promoter
- Open You → Host → Linked Promoter.
- Type their email or @username under Promoter email or @username.
- Set Commission with the slider: 5% to 50%, in steps of 5%. It starts at 10%.
- Tap Invite promoter.
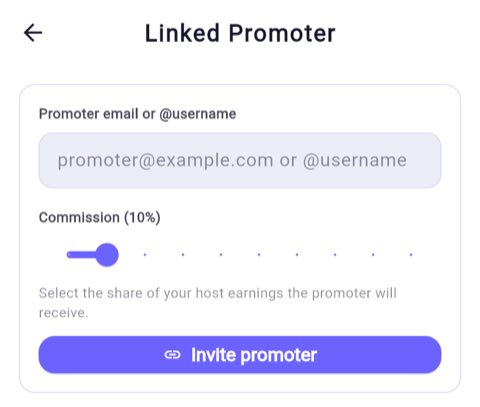
Lena teaches salsa. She types @tomdances, leaves the share at 10% and taps Invite promoter. She sees "Waiting for Tom to accept" until Tom answers.
You see "Invite sent to name. They have 14 days to accept.". Nothing changes until they accept. To take it back, tap Withdraw invite.
You can have one invite waiting at a time, and send up to 5 a day. An invite expires after 14 days. If they decline, you can't invite them again for 30 days. A Team or Organisation owner invites a promoter by email from the group's settings, with a share of 1% to 50%.
Promoter: accept an invite
- Open the alert "Promote name?" and tap Review. Promoter invites opens.
- Read the share you would earn.
- Tap Accept or Decline.
Tom gets "Promote Lena?" for 10% of what her events earn. He taps Review, then Accept, and sees "You now promote Lena."
A Promoter section appears on the You page, under Your roles. It has Create Promoter Event, Upcoming Events, Past Events, Promotions (Boost), Payout account and Who I Promote. Free Ride Tokens is in your Host section (it shows here only if you have no Host section).
Promoter: create an event for a host
- Open You → Promoter → Create Promoter Event.
- On Select Host, tap the host. For a Team or Organisation, pick the member who will host.
- Fill in the event steps. Pick a time at least 5 minutes ahead.
- Tap Publish Event.
Tom creates "Salsa Taster Night" for Lena, next Friday at 7pm, with a ℂ300 ticket. Lena gets "New event pending your approval".
The event waits for the host. The host opens You → Host → Pending Approval, taps the event, and taps Approve and publish or Decline. Riders can find it only after the host approves. The money is the host's; you earn your share as on any of their events.
What a promoter earns, and where to see it
- Open your Wallet and scroll to EARNINGS.
- Pick Promoter as the source.
A rider spends ℂ100 on Lena's per-minute class. JoyR1der keeps ℂ19. Of the ℂ81 left, Tom (10%) gets ℂ8 and Lena keeps ℂ73.
Promoter earnings cash out like a host's: the free ID check, a payout account, a $100 minimum and the 90-day hold. One payout covers both. If a rider paid with Bonus Clicks, that part of your share arrives as Bonus Clicks, which can't be cashed out.
Change the share, or stop
- Host: open Linked Promoter. Tap Change share to set a new share, or Remove Promoter to end the link.
- Promoter: open You → Promoter → Who I Promote. Press and hold a host, tap the bin, then Stop promoting.
Lena's classes are filling up thanks to Tom. She taps Change share and moves it from 10% to 20%. Tom is told, and the new share applies from then on.
A new share applies to money charged from then on. When a link ends, the promoter keeps what they've already earned, and their share of tickets bought while they were linked.
Community ModerationHelp keep JoyR1der safe as a volunteer Community Guardian.
Community Guardians are members who review reported posts, comments, images and other items, and help decide what stays and what comes down. It's a volunteer role for adults. Anyone 18 or over can apply, unless they lost the Guardian role before because a report against them was upheld.
How you become a Community Guardian
- Open You, then Dashboard.
- On the JoyR1der Guardian card, tap Become a JoyR1der Guardian. (If we invite you, a card in Discover says “Help the community — become a Community Guardian”. You can tap Get started on it instead.)
- Read how it works and tap Get started.
- Read the volunteer agreement and tap I agree to the terms. It explains what you'll see and how to look after yourself.
- Do three practice reviews. You need all three right. If you miss one, you can try again after 24 hours.
- Do the ID check. We cover the cost, so it's free for you.
- Tap Finish & start reviewing.
When you're done, Community Moderation appears on the You page under Your roles. That's your workspace.
Your workspace
How to review an item
- Open an item in the queue and look at what was reported and why. Reporters are kept anonymous: you'll see “Reporter 1”, “Reporter 2” and so on.
- Pick one button:
- Dismiss: no rule was broken.
- Penalise: a rule was broken.
- Remove only: the item is offensive but breaks no rule or law. It's taken down with no penalty for the poster. This button only works for low-severity items, and not once the poster has had several items removed this way lately.
- Unsure: you can't call it.
- Confirm your choice.
You vote on your own and don't see how others voted. Two matching votes decide an item. Penalise and Remove only count together as votes to take it down, and if either is Remove only, there's no penalty. Two Unsure votes, or no majority after three votes, send it to JoyR1der's official moderators, who are staff. The most serious reports go straight to them.
If anything looks illegal or involves a minor, don't download it or look into it. Vote Unsure and move on. Official moderators handle it.
Priya opens a reported comment that calls a host's cooking “awful”. It's rude, but it isn't abuse and breaks no rule. She taps Dismiss. Another Guardian also votes Dismiss, so the comment stays up and the item is closed.
A volunteer role, and how we say thank you
Guardians are unpaid volunteers, not JoyR1der staff. There's no pay, Clicks or Bonus Clicks for reviews or votes. When a host makes you the moderator of their live event, you join that event free so you can moderate it.
We say thank you in other ways:
- A Guardian badge on your profile, next to your name, while your role is active.
- Guardian milestones on your Dashboard's Achievements: First review, 50 reviews and 250 reviews.
- A thank-you note in your alerts at 10, 50, 100 and 250 items reviewed.
- The Guardian Leaderboard. Turn on Show me on the leaderboard there if you want your name on it.
Good, steady work can move you up from Community Guardian to Senior Guardian. Official moderators are JoyR1der staff.
If there are reports waiting and you haven't reviewed anything for 30 days, your Guardian role ends. You can apply again from your Dashboard.
Taking a break doesn't count against you. While Send me moderation requests is off, the 30 days stop. When you turn it back on, you get a fresh 30 days.
Your Guardian role also pauses, and your badge is hidden, while an age check we asked for is waiting, or until you've passed the ID check. It also pauses while your account is under review, suspended or otherwise restricted.
You may sometimes see upsetting reports. Take breaks whenever you need. Turn Send me moderation requests off to stop new work coming in. You stay a Guardian while it's off.
Ads, surveys and researchThe ads you see, how to turn them off, paid surveys and research studies, and where advertisers and researchers start.
JoyR1der shows some ads to pay for free features. You can report or hide any ad, and every plan from No Ads up removes third‑party ads. This part also covers JoyR1der surveys and paid research studies, and how advertisers and researchers get started.
Where you see ads
Report, hide or block an ad
- On the ad, tap “…”.
- Tap Report this ad, Stop seeing this ad or Block this advertiser.
- If you report it, pick a reason: Scam or misleading, Offensive or hateful, Sexual content, Puts a child at risk, Illegal content or Something else, then send it.
After the last step, our team reviews the report. A blocked advertiser's ads stop showing to you, including in other people's reposts.
Maya sees a feed ad promising "free Clicks" if she types in her password. She taps “…”, then Report this ad, picks Scam or misleading and sends it. Then she taps “…” again and picks Block this advertiser, so she won't see their ads again.
Repost or share an ad
Only ads in the General category have Repost and Share buttons. Ads in a checked category, such as housing, jobs or dating, don't.
- Tap Repost on the ad. In Repost this ad, add a few words if you like, then tap Repost. It goes on your profile and in your followers' Following feed, still marked as an ad.
- Or tap Share to send a link. An event ad shares the event's link. Any other ad shares a link that opens the ad in JoyR1der.
You can repost an ad once. You can't repost an ad your own account placed. A reposted ad can't take comments. You earn nothing from reposting or sharing an ad, and the advertiser isn't told who shared it. When the ad ends, your repost says it's no longer available.
Sam sees an event ad for a cooking class he likes. He taps Repost. His followers now see "Reposted an ad" with the class card in their Following feed. His friend Priya taps it and opens the event.
Turn ads off, or back on
- Open You, then My Subscriptions.
- Under Explore subscriptions, tap Subscribe on No Ads (or any plan above it). See Plans: No Ads to Ultra.
- Want to see ads anyway? On your plan's card in My Subscriptions, turn on Show me ads. Turn it off to hide them again.
After you subscribe, third‑party ads stop across your feeds and peeks. With Show me ads on, ads come back, including peek ads and the 2‑minute peek limit. Your plan's other perks keep working.
Omar peeks at DJ sets a lot. Without a plan he gets 2 minutes per event and sees peek ads. He buys No Ads for ℂ1,500 a month. Now he can peek for as long as he likes, with no ads.
Take a JoyR1der survey for Bonus Clicks
Sometimes JoyR1der asks a few questions. When a survey is meant for you, Survey shows under Earn Bonus in Discover's … menu. It disappears when there's no survey for you.
- Tap … on Discover, then Survey under Earn Bonus.
- Read the line that says how many Bonus Clicks you'll earn.
- Answer every question.
- Tap Submit & earn. Or tap No thanks to skip it.
After the last step you see "Thank you! 🎉" and the Bonus Clicks go into your balance. You can take each survey once.
Leo sees Survey in Discover's … menu. The survey offers 50 Bonus Clicks for six questions about the events he likes. He answers them all and taps Submit & earn 50 Bonus. He can spend the 50 Bonus Clicks on any event that shows Accepts bonus.
Take part in a paid research study
Research teams pay members to answer questions or join an interview. You don't apply. When a study is looking for people like you, Paid research study shows under Earn Bonus in Discover's … menu.
- Tap Paid research study. You see "You're invited to a paid research study" and how much you could earn.
- Tap Start screening, answer the questions and tap Submit. If you qualify, the research team sees your answers.
- If you see You qualified!, tap Verify identity. Paid studies need a one‑time ID check. It's free for research.
- On the consent page, read What you're agreeing to (recording, how your data is used, who watches, how you're paid, and your right to leave). Type your full name and tap Agree & continue.
- Tap Join the study. You see You're enrolled.
- Your research sessions now shows under Earn Bonus when you have a session or an interview time to pick. If the study has interviews, open it, tap Pick a time, choose one and tap Book. It reads Live now while a session is live.
- When it's time, open Your research sessions, read Before you join, and tap Join — start recording me.
After your session, the research team confirms it. Then your payment goes into your Earnings. Like other earnings, it's held for 90 days before you can cash it out. You never pay anything to take part. You're reminded 15 minutes before a session.
You can change or cancel an interview time up to the cut‑off the study shows. To leave a study, open Your research sessions, tap My research studies, then Withdraw from this study. Tick Also delete my recordings if you want them removed, then tap Withdraw. You're still paid in full for sessions you attended. You can't join a study run by a team you're on, so you're never asked to re-sign its consent either.
Grace sees Paid research study in the … menu. She answers five screening questions and qualifies for a 30‑minute interview. She verifies her ID, signs the consent with her full name, books Tuesday at 6 pm and joins from Your research sessions. A week later the team confirms her session, and her payment shows in her Earnings.
For advertisers: JoyR1der Ads
Ads are bought on a separate website, JoyR1der Ads, not in the app. You pay in US dollars from an ad wallet, topped up by card from US$5. You can promote an event, run image and video feed cards, sponsor riders' seats, or take over a category or search result by the hour.
- Open You, then Getting set up.
- Tap Advertise on JoyR1der and read the short note. Tap Continue to go through it.
- On the web, the last page shows the website address, with Open the website and Copy link. In the phone apps the note only says that JoyR1der Ads is on the web, with no link.
- On the website, sign in with the same email and password you use in the app. The first time, link an authenticator app.
- Do the one‑time ID check there. The website shows the price, if any, before you start.
Until JoyR1der launches, the note says "The website opens when JoyR1der launches." Every ad is checked automatically before it runs. The full advertisers guide is at joyr1der.com/advertisers. The ID check for advertising costs ℂ250 unless it's free for you (see The full ID check).
Ana runs a dance studio. On her laptop she opens You, Getting set up, Advertise on JoyR1der, and taps Open the website. She signs in, links her authenticator app, does the ID check, adds US$20 to her ad wallet and promotes her Saturday class.
For researchers: Research Studio
Research teams plan studies and recruit people on a separate website, Research Studio. You run the live sessions from the app.
- Open You, then Getting set up.
- Tap Run research and read the note.
- On the web, the last page shows the website address, with Open the website and Copy link. In the phone apps there's no link.
- On the website, sign in with the same email and password you use in the app.
- Create your lab or company workspace. The website runs an ID check at this step.
- Add funds by card. The website shows the full cost, including JoyR1der's fee, before you pay.
The researcher guide is at joyr1der.com/research-guide. The ID check for research costs ℂ250 unless it's free for you (see The full ID check). Signed up with Google or Apple? Set a password first (see Password and email) so you can sign in on the website.
Dr Okafor's university team wants ten interviews with people who host cooking streams. On the web she opens Run research, taps Open the website, signs in, creates her lab workspace, passes the ID check and funds the study by card.
Staying safe and verifyingAge checks, daily limits, reporting, blocking, appeals and your privacy.
Everyone on JoyR1der is 18 or over. That rule is there to keep children out. It never allows adult content. You can watch without any check. A free selfie check unlocks most of the rest.
Which check you need
Do the free selfie check
- Open You. Under Account, tap Age check & ID. It says "Not done yet — take the free selfie". (The app also opens this check by itself when you first try something that needs it.)
- On Quick age check, read the Biometric data consent.
- Tick the box that starts "I have read the above and give my written consent".
- Tap Take a selfie and follow the camera prompts.
After the last step, the row reads Age confirmed with a selfie. The photo is never stored, and no person sees it. If the selfie can't confirm you're 18 or over, you see "We need a quick ID check". That ID check is free.
Tap Verify with a government ID instead. This ID check costs ℂ250 unless it's free for you (see below). The app tells you the price before anything is charged. Too many selfie tries lock it for an hour.
Priya wants to tip a guitarist. The app asks for the selfie check first. She ticks the consent box, taps Take a selfie, and a few seconds later she's confirmed. She sends her tip.
The full ID check
The full ID check is done once, through Stripe. Stripe handles your documents. JoyR1der never sees or stores them.
- Tap any Verify ID button the app shows you, or open You, then Age check & ID.
- If the app asks, read Verify your identity. It says whether a fee applies. Tap Verify with ID, or Not now.
- On Verify your ID, check the cost line, then tap Verify my ID with Stripe.
- Follow Stripe's steps, then come back to the app.
After the last step, the row reads ID verified, and you see "Your ID is verified". If Stripe can't read your date of birth, the row reads "ID passed — we're confirming your date of birth. Nothing to do."
It's free for payouts, moderating, raising your daily limits, going on camera, selling content, taking part in research, and when the app asks you after a selfie or a report. It's also free in your first 30 days after you join, and while you're on Plus or higher.
Otherwise it costs ℂ250 (about $2.50) for advertising (including setting up a company account on JoyR1der Ads), running research, or choosing ID instead of the selfie. Starting a Team or Organisation in the app needs no check at all. The fee never blocks you. If your Clicks are short, we take it from Clicks you buy or earn later. A Pay ID fee row then shows on the You page. Pay it within 90 days, or payouts and business tools pause until it's paid. On the web you can also pay it by card (Pay now with card).
Sam joined six months ago and has no plan. He wants to advertise his bike shop, so the ID check costs ℂ250. He has only ℂ100. The check goes ahead, and ℂ150 is owed. Next week he buys Clicks, and the ℂ150 is taken from them. Had he started advertising in his first month, the check would have been free.
Get the blue check
The blue check next to a name shows the account is who it says it is. It's useful for public figures, brands and creators.
- Open You and tap Get Verified (it's gone once you're verified).
- Fill in Full name / brand to verify.
- Optional: add links or other proof, and up to 3 images or PDFs with Add file.
- Tap Submit for review. JoyR1der staff review every request.
- When asked, finish the ID check with Stripe. The screen shows the cost, if any, before you start.
As soon as you pass the ID check, the blue check is added. On Plus or higher, your plan card in My Subscriptions has a button, Get your blue check — free with your plan, that goes straight to the free ID check.
The band Northlight wants the blue check. Their manager types "Northlight", adds a link to their record label's page, and taps Submit for review. After staff review it, she completes the Stripe ID check, and the blue check appears.
Daily limits on Clicks
To stop fraud, there's a limit on how many Clicks you can buy and spend in any 24 hours. The limit counts the last 24 hours, not the calendar day. It counts bought Clicks only. Bonus Clicks and free‑ride tokens don't count.
If you reach your limit, the app says so and offers Verify ID to raise it. The ID check for raising your limit is free.
With only the selfie check, Maya buys ℂ10,000 (about $100) of Clicks at 8 pm. She can't buy more until 8 pm the next day, unless she taps Verify ID to raise it and completes the free ID check. Then she could buy up to $10,000 in any 24 hours.
Report something
You can report an event, a live stream, a profile, a post, a comment on an event, a message, a piece of content or an ad. Every report is reviewed. Reports can be reviewed by Community Guardians or JoyR1der staff, and serious ones go straight to staff. The person you report never learns who reported them.
- Open the report from one of the places above. You see "What would you like to report?"
- Pick a reason: Inappropriate content, Nudity or sexual content, Violence, Harassment or bullying, Host appears under 18, Misleading description, Copyright infringement, Spam or Other. For copyright you can say who owns it.
- Optional: describe what you saw.
- Optional: add up to 3 screenshots. In a live stream, tap Capture screen. Anywhere, tap Choose image.
- Tap Submit report.
After the last step you see "Report submitted. Thank you." (Reporting a post is shorter: pick a reason and it's sent.)
During a live gaming stream, someone keeps posting a scam link in the chat. Sam opens the stream tools, taps Report, picks Spam, taps Capture screen and then Submit report.
Block or mute someone
- On their profile, tap ⋮. (On a post, tap “…”. On an event card, “…” has Mute host and Block host, and Block host doesn't ask you to confirm.)
- Tap Mute to hide their content from your feeds. They aren't told.
- Or tap Block, then Block again to confirm.
After you block someone, you won't see their posts or events, and they won't see yours.
To undo it: open the People chip's menu on Discover and pick Blocked or Muted. Swipe left on the person, or press and hold them, and tap Unblock or Unmute. Unblock asks you to confirm first. You then have 5 seconds to tap Undo.
A rider keeps sending Tom rude messages. Tom opens their profile, taps ⋮, then Block, and confirms. A month later he changes his mind. He presses and holds People, picks Blocked, swipes left on them, taps Unblock and confirms.
If you're reported: Account Reviews and appeals
When there's a review, a strike or a restriction on your account, an Account Reviews row shows on the You page under Account. A report alone doesn't mean you broke a rule: a moderator decides first.
- Open You and tap Account Reviews.
- Read Current restrictions and Strikes on your account. Each strike says how serious it is (Minor, Serious or Serious safety) and when it expires.
- On the item you disagree with, tap Appeal.
- In Explain your side, write what happened.
- Tap Submit appeal.
After the last step you see "Appeal sent — a moderator will review it." A different, more senior moderator decides. The result can be lighter or stricter. If an appeal succeeds, the penalty is reversed.
You can appeal each decision once. Appeal a penalty within 7 days, before it becomes final. You can also appeal an account closure, or content taken down for copyright. If a review has been open for 48 hours, you can tap Request update once.
Ravi's video of his own piano piece is taken down for copyright. Two days later he opens Account Reviews, taps Appeal, explains that he wrote and recorded it, and taps Submit appeal.
If your account is suspended
If your account is suspended, restricted or closed, the app opens on a screen that says so. It shows the reason, and the end date if there is one ("This doesn't end on its own" if not).
- Tap See details & appeal to open Account Reviews (shown when the decision can be appealed).
- Or tap Manage subscriptions to cancel a plan. Nothing renews while your account is on hold.
- Or tap Sign out, or Delete my account.
If the JoyR1der team took the action and you think it's a mistake, write to support@joyr1der.com. While suspended, you can open only these screens and the policies.
Kim's account is suspended for 3 days. The screen shows the reason and the end date. She taps See details & appeal, reads the decision and appeals it.
The community rules, in one line each
- Be decent. JoyR1der is not an adult‑content platform.
- No violence, threats, harassment or hateful conduct.
- No pornography, nudity or sexual content.
- Zero tolerance for anything that harms or endangers children or animals. It's removed straight away.
- The full rules are in Code of Conduct (You, then Settings).
Your privacy switches (who sees your real name, who can message you, who can find you) are in Privacy & Safety.
Settings and your accountEvery Settings page, plus password, email, sign‑out and deleting your account.
Open You and tap Settings (under Account). Settings has four parts: App, Help & policies, Privacy & about and Danger zone.
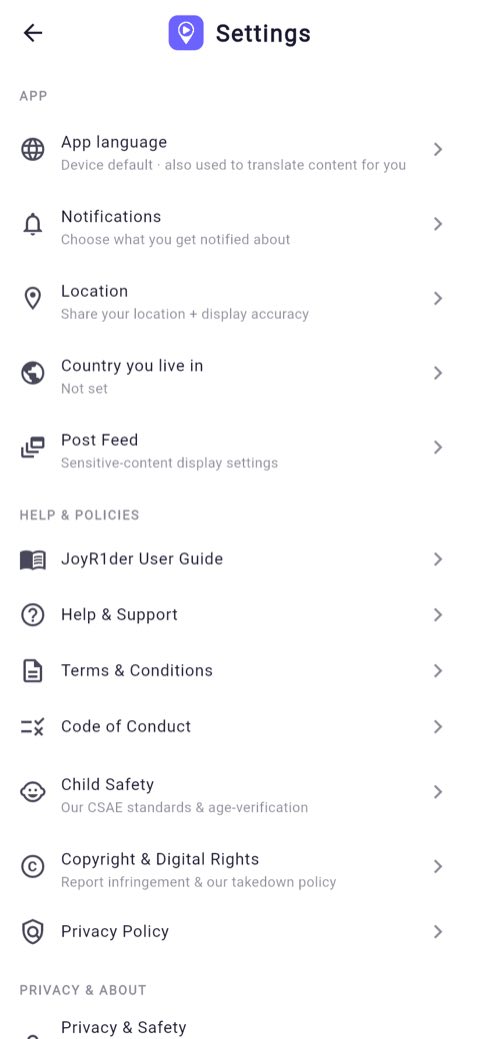
Change the language, or light and dark mode
- Open You, then Settings, then App language.
- Pick a language, or Device default to follow your phone.
- For light or dark mode, tap … at the top of the You page (or Discover or Messages). Under Appearance, pick System, Light or Dark.
After the last step the app changes straight away. Your language is also used to translate other people's content for you.
Ines picks Português in App language. Then she taps … on the You page and picks Dark.
Choose your emails and notifications
- Open You, then Settings, then Notifications.
- All emails: on means you get emails from JoyR1der, including account and security notices. Off stops them all, and the other email switches can't be changed.
- Optional emails: updates such as new followers and shared recordings. On until you turn it off.
- News and offers: news, offers and event suggestions. Off until you turn it on.
- Weekly events email: a weekly list of upcoming events. It's sent only while News and offers is on.
- Host online emails: an email when a host you're a member of comes online, only while you're offline. It needs Optional emails on. The in‑app alert always shows.
- Hosts also see Push notifications: New ride requests and Payout processed. Turning one off stops the phone notification. It still shows in your Alerts.
Ben wants the weekly "what's on" email. He turns on News and offers. Weekly events email is already on, so his first weekly email arrives the next week.
Share your location
- Open You, then Settings, then Location.
- Turn on Allow my location. It's off until you turn it on.
- Move the Display accuracy slider: 500 m, 1 km, 2 km or 5 km.
After the last step, your location is shown as a random point within that distance, never your exact spot. Riders use it to find hosts near them. Hosts appear on the map only while their Available Now is on. If your phone or browser blocks location, the page says "JoyR1der can't get your location" and shows how to fix it.
Ken hosts language lessons. He turns on Allow my location and sets 2 km. Riders nearby see him somewhere within 2 km of where he really is.
Set the country you live in
- Open You, then Settings, then Country you live in.
- In Choose your country, pick your country.
After the last step you see "Country saved". It decides which ads can be shown to you. The app may also ask "Where do you live?" once. JoyR1der isn't offered in some countries and regions.
Aisha moves from Kenya to Canada. She opens Country you live in, picks Canada and sees "Country saved".
Post Feed: sensitive posts and your presence
- Open You, then Settings, then Post Feed.
- Show potentially upsetting content by default: when off, flagged posts stay blurred until you tap View.
- Show sensitive content by default: covers graphic content only, such as news, medical or injury posts.
- Show my presence on Posts: others see a live glow on your posts while you're active in the app (green while active, then briefly orange).
Posts our checks flag as possibly breaking the rules always start blurred, whatever you choose. The page also shows your posting plan and whether Eternal Posts is on.
Jo is a nurse and follows medical news. She turns on Show sensitive content by default, so injury photos in news posts aren't blurred for her.
Privacy & Safety switches
Open You, then Settings, then Privacy & Safety. (The same switches are in You, Rider, Privacy.) If a switch can't be saved, it flips back and tells you.
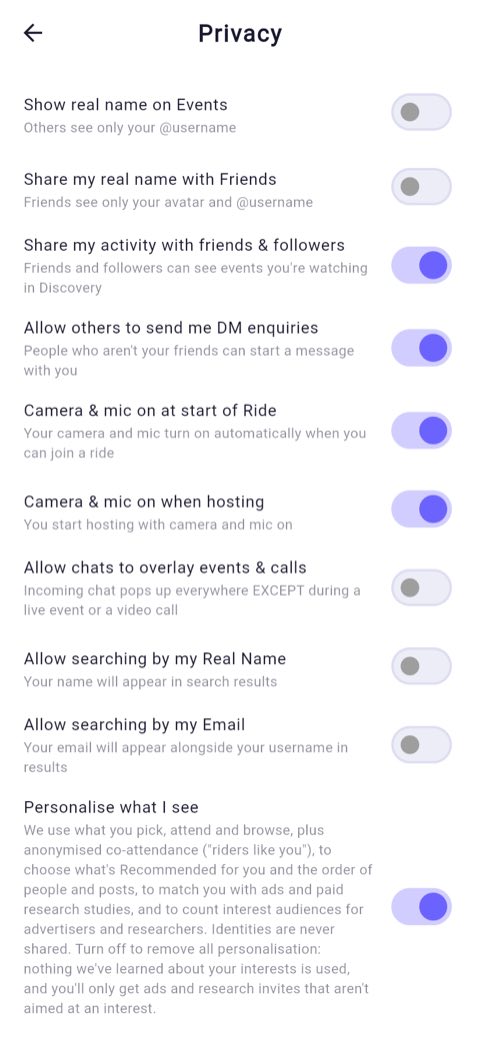
Zoe wants riders to see only @zoe. She turns off Show real name on Events and Allow searching by my Real Name. Her friends still see her name, because Share my real name with Friends is on.
Download my data
- Open You, then Settings, then Privacy & Safety.
- Scroll to the bottom and tap Download my data.
After the last step you get a JSON file with your profile, consents, wallet history, rides and social lists. On the web it downloads. On a phone the share sheet opens so you can save it. Your uploads and purchases download from where you manage them.
You can download a few times an hour. After that you see "You've downloaded your data a few times this hour. Try again later."
Before she deletes her account, Rosa taps Download my data on her phone and saves the file to her cloud drive.
Help, policies and Version & Logs
- Open You, then Settings.
- Tap Help & Support for help and answers, or a policy (Terms & Conditions, Code of Conduct, Child Safety, Copyright & Digital Rights or Privacy Policy).
- On a phone, a policy opens in your browser. On the web, tap the Open button to open it in a new tab.
- If support asks for your log, tap Version & Logs, then the copy button at the top.
You can also email support@joyr1der.com. Version & Logs shows your app version and a debug log of the last 24 hours. Its buttons at the top refresh, copy or clear the log.
Lena's stream keeps freezing. Support asks for her log. She opens Version & Logs, taps the copy button and pastes the log into her email to support@joyr1der.com.
Password and email
These rows are on the You page, under Account.
- To change your password, tap Change Password. Enter your Current password, a New password (at least 8 characters) and Confirm new password, then tap Update.
- Signed up with Google or Apple only? Tap Set a password. We email you a link to set one.
- To change your email (password accounts only), tap Change email. Enter the New email address and your Current password, then tap Send confirmation link.
After a password change you see "Password updated." After an email change, open the link we send to the new address. Your email stays the same until you do.
Jay signed up with Google. He wants to sign in on the Research Studio website with an email and password. He taps Set a password, opens the email and sets one.
Sign out, or sign out everywhere
- Scroll to the bottom of the You page and tap Sign Out.
- In "Sign out?", tap Sign out for this device only, or Sign out everywhere.
After Sign out everywhere, you see "Signed out of all devices. Other devices are signed out within about an hour." Each one has to sign in again.
Tom leaves his tablet on a train. On his phone he taps Sign Out, then Sign out everywhere. Within an hour the tablet is signed out too.
Delete your account
- Open You, then Settings. Under Danger zone, tap Delete account.
- Read This action is permanent and the list of what you'll lose, with the amounts.
- Confirm it's you: type your password, or (for Google or Apple accounts) confirm with them when you tap Delete.
- If you have an advertiser account, you can tick Also permanently close my Advertiser account.
- If anything will be forfeited, tick I understand and agree to the forfeiture.
- Tap Delete My Account.
After the last step, your profile, sign‑in, personal details and settings are removed, and your posts and content are hidden. Messages you sent stay with the people you sent them to, shown as from "Deleted user". Your @username is held for 30 days, then released. This can't be undone.
- Unspent Clicks you bought are forfeited. They can't be refunded or paid out.
- Your Bonus Clicks are removed.
- Earnings still on hold are forfeited. Earnings ready to pay out are paid to your payout account first.
- Classes, packs and passes you've paid for with other hosts are given up, with no refund.
- If you host, your upcoming classes and events are cancelled, and riders get their money back straight away.
- If you close your advertiser account too, its campaigns stop. Unspent paid ad money goes back to your card, usually within 5–10 days. Promotional ad credit is removed.
If you earn on JoyR1der, your account closes straight away but is deleted only after a hold: at least 24 hours, or longer if a refund window is still open. The app shows the date. Payouts pause until then. To stop it, sign back in before that date and tap Cancel the deletion. You can't delete your account while you're live: end your stream first.
Ola has ℂ400 of unspent Clicks and 50 Bonus Clicks. The screen lists both. She ticks I understand and agree to the forfeiture, types her password and taps Delete My Account. The ℂ400 and the 50 Bonus Clicks are gone, and her account is deleted.
Plans: No Ads to UltraFive optional monthly or yearly plans, single add‑ons, and gift memberships.
Plans are optional. Each plan includes everything in the plan below it. You pay in Clicks, monthly or yearly. Plans accept Bonus Clicks: your Bonus Clicks are used first, then your bought Clicks. (A host membership is different: it's a monthly membership with one host. See Gift a host membership.)
A year costs the same as 10 months for No Ads, Plus, Pro and Premium (2 months free), and 11 months for Ultra (1 month free). On a yearly plan, the Bonus Clicks still arrive one month at a time. With Free or No Ads you can ask @howto 10 questions a day; from Plus up, 25.
It covers public group events only, up to 3 hours per event per day. Near the end, the app asks whether you want to keep riding and pay with Clicks. You never start paying without saying yes. Available Now rides, 1:1 bookings, solo sessions and private group events always bill as normal. The host is still paid: JoyR1der pays them their normal share in Bonus Clicks.
Subscribe to a plan
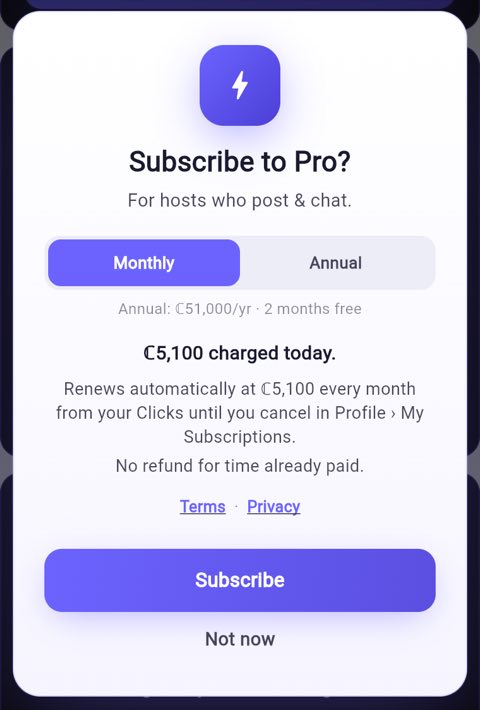
- Do the free selfie check if you haven't (see the selfie check).
- Open You, then My Subscriptions.
- Under Explore subscriptions, find the plan and tap Subscribe.
- In "Subscribe to …?", pick Monthly or Annual.
- Check the amount charged today and the renewal line.
- Tap Subscribe. (Tap Not now to back out. Nothing is charged until you tap Subscribe.)
After the last step, the plan starts straight away and shows under Your subscriptions. Its first month of Bonus Clicks arrives at once. It renews from your Clicks every month (or every 12 months on Annual) until you cancel. If you don't have enough Clicks, the app opens Buy Clicks for the amount you're short.
Priya has 500 Bonus Clicks and ℂ3,000. She subscribes to Plus monthly for ℂ2,700. The app uses her 500 Bonus Clicks first, then ℂ2,200 of her bought Clicks. Straight away she gets her first 100 Bonus Clicks from Plus.
Upgrade to a higher plan
- Open You, then My Subscriptions.
- Under Explore subscriptions, tap Subscribe on a higher plan. (Plans at or below yours aren't shown.)
- Read the upgrade credit for the unused time on your current plan, and what's charged today.
- Tap Subscribe.
After the last step, the new plan starts a fresh period straight away. You're charged its price minus the credit. Bonus Clicks you already got this month aren't given twice. If your old plan was set to end, auto‑renew turns back on.
You can't buy a lower plan while a higher one is active. To move down, cancel your plan. When it ends, subscribe to the lower one.
Sam is on Plus monthly (ℂ2,700) with 15 of 30 days left. He upgrades to Pro (ℂ5,100). His credit is half of ℂ2,700, so ℂ1,350. He pays ℂ3,750 today. He already got 100 Bonus Clicks from Plus this month, so Pro adds 200 more, making 300.
Cancel a plan
- Open You, then My Subscriptions.
- On your plan's card, tap Cancel subscription.
- In "Cancel …?", tap Cancel auto‑renew. (Tap Keep it to back out.)
After the last step you see "Auto‑renew turned off — active until" and a date. Your plan keeps working until the end of the time you paid for, then it ends. There's no refund for time already paid. Changed your mind before that date? Tap Resume subscription.
The card shows Payment failed and a date. We try again automatically. Tap Top up Clicks to add Clicks before that date (3 days), or the plan ends. If we ever change a plan's price, you're told at least 7 days ahead. A higher price needs you to tap Accept new price; if you don't, the plan ends and you aren't charged again.
Maya's Premium plan renews on 30 June. On 10 June she taps Cancel subscription, then Cancel auto‑renew. She keeps Premium until 30 June, and nothing more is charged.
Single add‑ons
Want one perk without a whole plan? These are sold on their own, monthly, under Explore subscriptions in My Subscriptions. They accept Bonus Clicks.
If you then buy a plan that includes an add‑on, the add‑on stops renewing, so you don't pay twice.
Gift a host membership
Many hosts sell monthly memberships. You can pay for someone else's. A gift is prepaid for the months you choose, with no repeat charge. You gift one membership at a time, to one person.
- Open the host's profile. In the Membership part, tap Gift a membership. (In a live event, open the Tip panel and tap Gift a membership at the bottom.)
- Pick the membership (its price is on it) and the Term: 1, 3, 6 or 12 months.
- Under Gift to, type their @username (the @ is optional) and tap them in the list. Anyone can be gifted, not just people in the event.
- Tap Continue. Check the person, the total and your balance.
- Tap Gift now. (Tap Cancel to change something. Nothing is charged before you tap Gift now.)
You see "Gift sent". Tap Gift another to gift someone else, or Done. The person gets a notification to accept it. Someone who's already a member of that host shows "Already a member" in the list and can't be picked. You can't gift to yourself or to the host. Bonus Clicks count only if the host's memberships accept them. A gift from a live event shows in its chat as "you just gifted a membership to host to them".
Kai's sister loves a yoga host whose membership is ℂ500 a month. Kai opens the host's profile, taps Gift a membership, chooses 3 months, types his sister's username and taps her, taps Continue and then Gift now ℂ1500. His sister gets a notification and taps to accept.
Accept, assign or reclaim gift memberships
- Open You, then My Gift Memberships.
- Under Gifts for you, tap Accept to start a membership someone gave you.
- Under Gifts you bought, a gift bought in an older version of the app may say "Unassigned — assign or reclaim". Tap its menu and choose Assign (type their @username) or Reclaim (refund).
After you accept, you see "Membership activated!" If you're already a member of that host, the gift adds its months to your membership. A reclaim refunds the gift to you. You can reclaim only before the gift is accepted.
Lucy's friend gives her 6 months with a fitness host. Lucy opens My Gift Memberships and taps Accept. Her membership runs for 6 months, then ends, with nothing to cancel.
Ask @howtoJoyR1der's AI helper. Tag it with a question and it answers in the comments.
@howto answers questions about how JoyR1der works, using this guide. It's an account run by JoyR1der. It has a green robot picture and an Official badge. Its replies are marked "AI answer from the User Guide. It can get things wrong."
Ask @howto a question
- Write a post, or a comment on any post.
- Type @howto and your question in it.
- Post it.
- To follow up, reply to @howto's answer. No tag is needed. A comment on one of @howto's own posts also reaches it.
After you post, @howto answers in the comments, usually within a minute, and you get a notification ("@howto answered"). When you reply to an answer, it remembers what it said before.
Maya writes a comment: "@howto how do I cancel my Plus plan?" A minute later @howto replies with the steps from this guide. Maya replies "and do I get a refund?", and @howto answers that question too.
Up to 10 a day without a plan or with No Ads, and 25 a day with Plus, Pro, Premium or Ultra. The day starts again at midnight UTC. Go over it and you get one alert: "@howto daily limit". Questions past your number aren't answered. A message that asks nothing, such as "thanks", gets no reply and usually doesn't use a question (up to 3 a day are given back). If your post or comment is deleted or taken down before @howto gets to it, the question is given back. If @howto is very busy, your question waits in the queue and is answered the next day; you're told once.
What @howto can't do
- It only explains how JoyR1der works. It can't see or change your account.
- It can't refund, unban or verify anyone.
- It never goes live, hosts, takes bookings or rides.
- It's an AI, so it can get things wrong. Check anything important in this guide or the Terms. Where they differ, the Terms win.
- For your own account or money, open You, then Settings, then Help & Support, or email support@joyr1der.com.
Tips from @howto
Follow @howto to get short how‑tos in your Posts feed, about one an hour. A person at JoyR1der checks every tip before it posts.
Your privacy, and blocking @howto
When you tag or reply to @howto, your question, the post, the comment you replied to and your @username go to our AI provider to write the answer. The answer is posted publicly where you asked. Leave personal details out.
- To stop @howto completely, open its profile and tap ⋮.
- Tap Block, then Block again to confirm.
After you block it, @howto won't answer you, and nothing you write is sent to it or counted.
Sam doesn't want any AI reading his posts. He opens @howto's profile, taps ⋮, then Block, and confirms. If he tags @howto by mistake later, nothing is sent and nothing is counted.